
Customers often struggle to grow their email lists, missing opportunities to build direct relationships and nurture leads. Imagine if you could consistently capture new subscribers with eye-catching, well-timed opt-in forms without interrupting the user experience.
In this guide, I’ll walk you through how to create a newsletter popup in WordPress. You’ll discover how to design a compelling WordPress newsletter popup that engages visitors and converts them into subscribers. By the end, you will understand how to implement a high-performing newsletter popup that integrates with your site and boosts your email marketing efforts.

- Why a Newsletter Popup is Essential for Your WordPress Site
- What makes a WordPress Newsletter Popup successful?
- Creating Your Newsletter Popup in WordPress
- Step 1: Download FireBox Lite
- Step 2: Install FireBox Lite
- Step 3: Create a New Campaign and Select a Newsletter Template
- Step 4: Customize Your Newsletter Popup Design
- Step 5: Configure Display Conditions and Triggers
- Step 6: Integrate with Your Email Marketing Service
- Step 7: Manage Submissions and Set Up a Thank-You Message
- Best Practices for a High-Converting Newsletter Popup in WordPress
- Measuring the Success of Your Newsletter Popup Campaigns
- Conclusion
Why a Newsletter Popup is Essential for Your WordPress Site

Your email list is one of your most valuable assets. Unlike social media algorithms or changing ad costs, your email list provides a direct line of communication with an audience that has actively chosen to hear from you. Building and growing this list is crucial for sustained business growth, allowing you to:
- Promote new products or services.
- Share valuable content and updates.
- Build a community around your brand.
- Drive repeat traffic and sales.
While static signup forms in footers or sidebars are useful, a newsletter popup significantly increases visibility and conversion rates. It ensures your opt-in offer is seen by visitors who might otherwise miss it. To create a successful WordPress newsletter popup, it must be engaging, well-timed, and provide clear value. Research indicates that high-performing WordPress newsletter popups can achieve impressive conversion rates, making them a powerful lead generation tool.
What makes a WordPress Newsletter Popup successful?
A newsletter popup in WordPress isn’t just about showing a form; it’s about strategic design and smart timing. Key elements include:
- Clear Value Proposition: Why should someone subscribe? What will they gain (exclusive content, discounts, early access)?
- Compelling Design: Visually appealing and on-brand, catching the eye without being jarring.
- Seamless Integration: It should feel like a natural part of your website experience, not an interruption.
- Smart Targeting: Displaying the popup to the right person at the right time for maximum impact.
- Easy Form Completion: Minimal fields to reduce friction and encourage sign-ups.
By focusing on these aspects, your WordPress newsletter popup can become a consistent source of new subscribers.
Creating Your Newsletter Popup in WordPress
Before you can begin the tutorial, you must install a reliable plugin on your site. When it comes to popups, or forms, FireBox is the best WordPress popup plugin. It’s a powerful popup maker for WordPress based on the Gutenberg Block Editor. With a user-friendly interface, FireBox allows you to easily create and customize various popups, including lightboxes, sticky bars, sidebars, fullscreen popups, slide-ins, floating buttons, and more.
FireBox offers precise control over when the forms appear, giving you access to creating personalized and targeted forms with display conditions based on Device, Referrer, Page, URL, Cookie, Geolocation, Datetime, and even conditions for WooCommerce.
Step 1: Download FireBox Lite
The very first step is to download FireBox Lite and install it on your WordPress site by following the steps listed below.
Step 2: Install FireBox Lite
After downloading the FireBox Free installation zip file, upload it to your site.
- Head to your WordPress dashboard and click on Plugins > Add New.
- Choose the zip file you have just downloaded. Click on install.
- Once the plugin is installed, click the Activate Plugin button to activate the plugin on your site.
If you need any help with the installation process, see the documentation on installing FireBox for help. Looking to go Pro? Don’t worry, if you’re already using FireBox Lite, you can easily upgrade from Lite to Pro. However, after upgrading to Pro, you must also activate your license to ensure you receive automatic plugin updates.
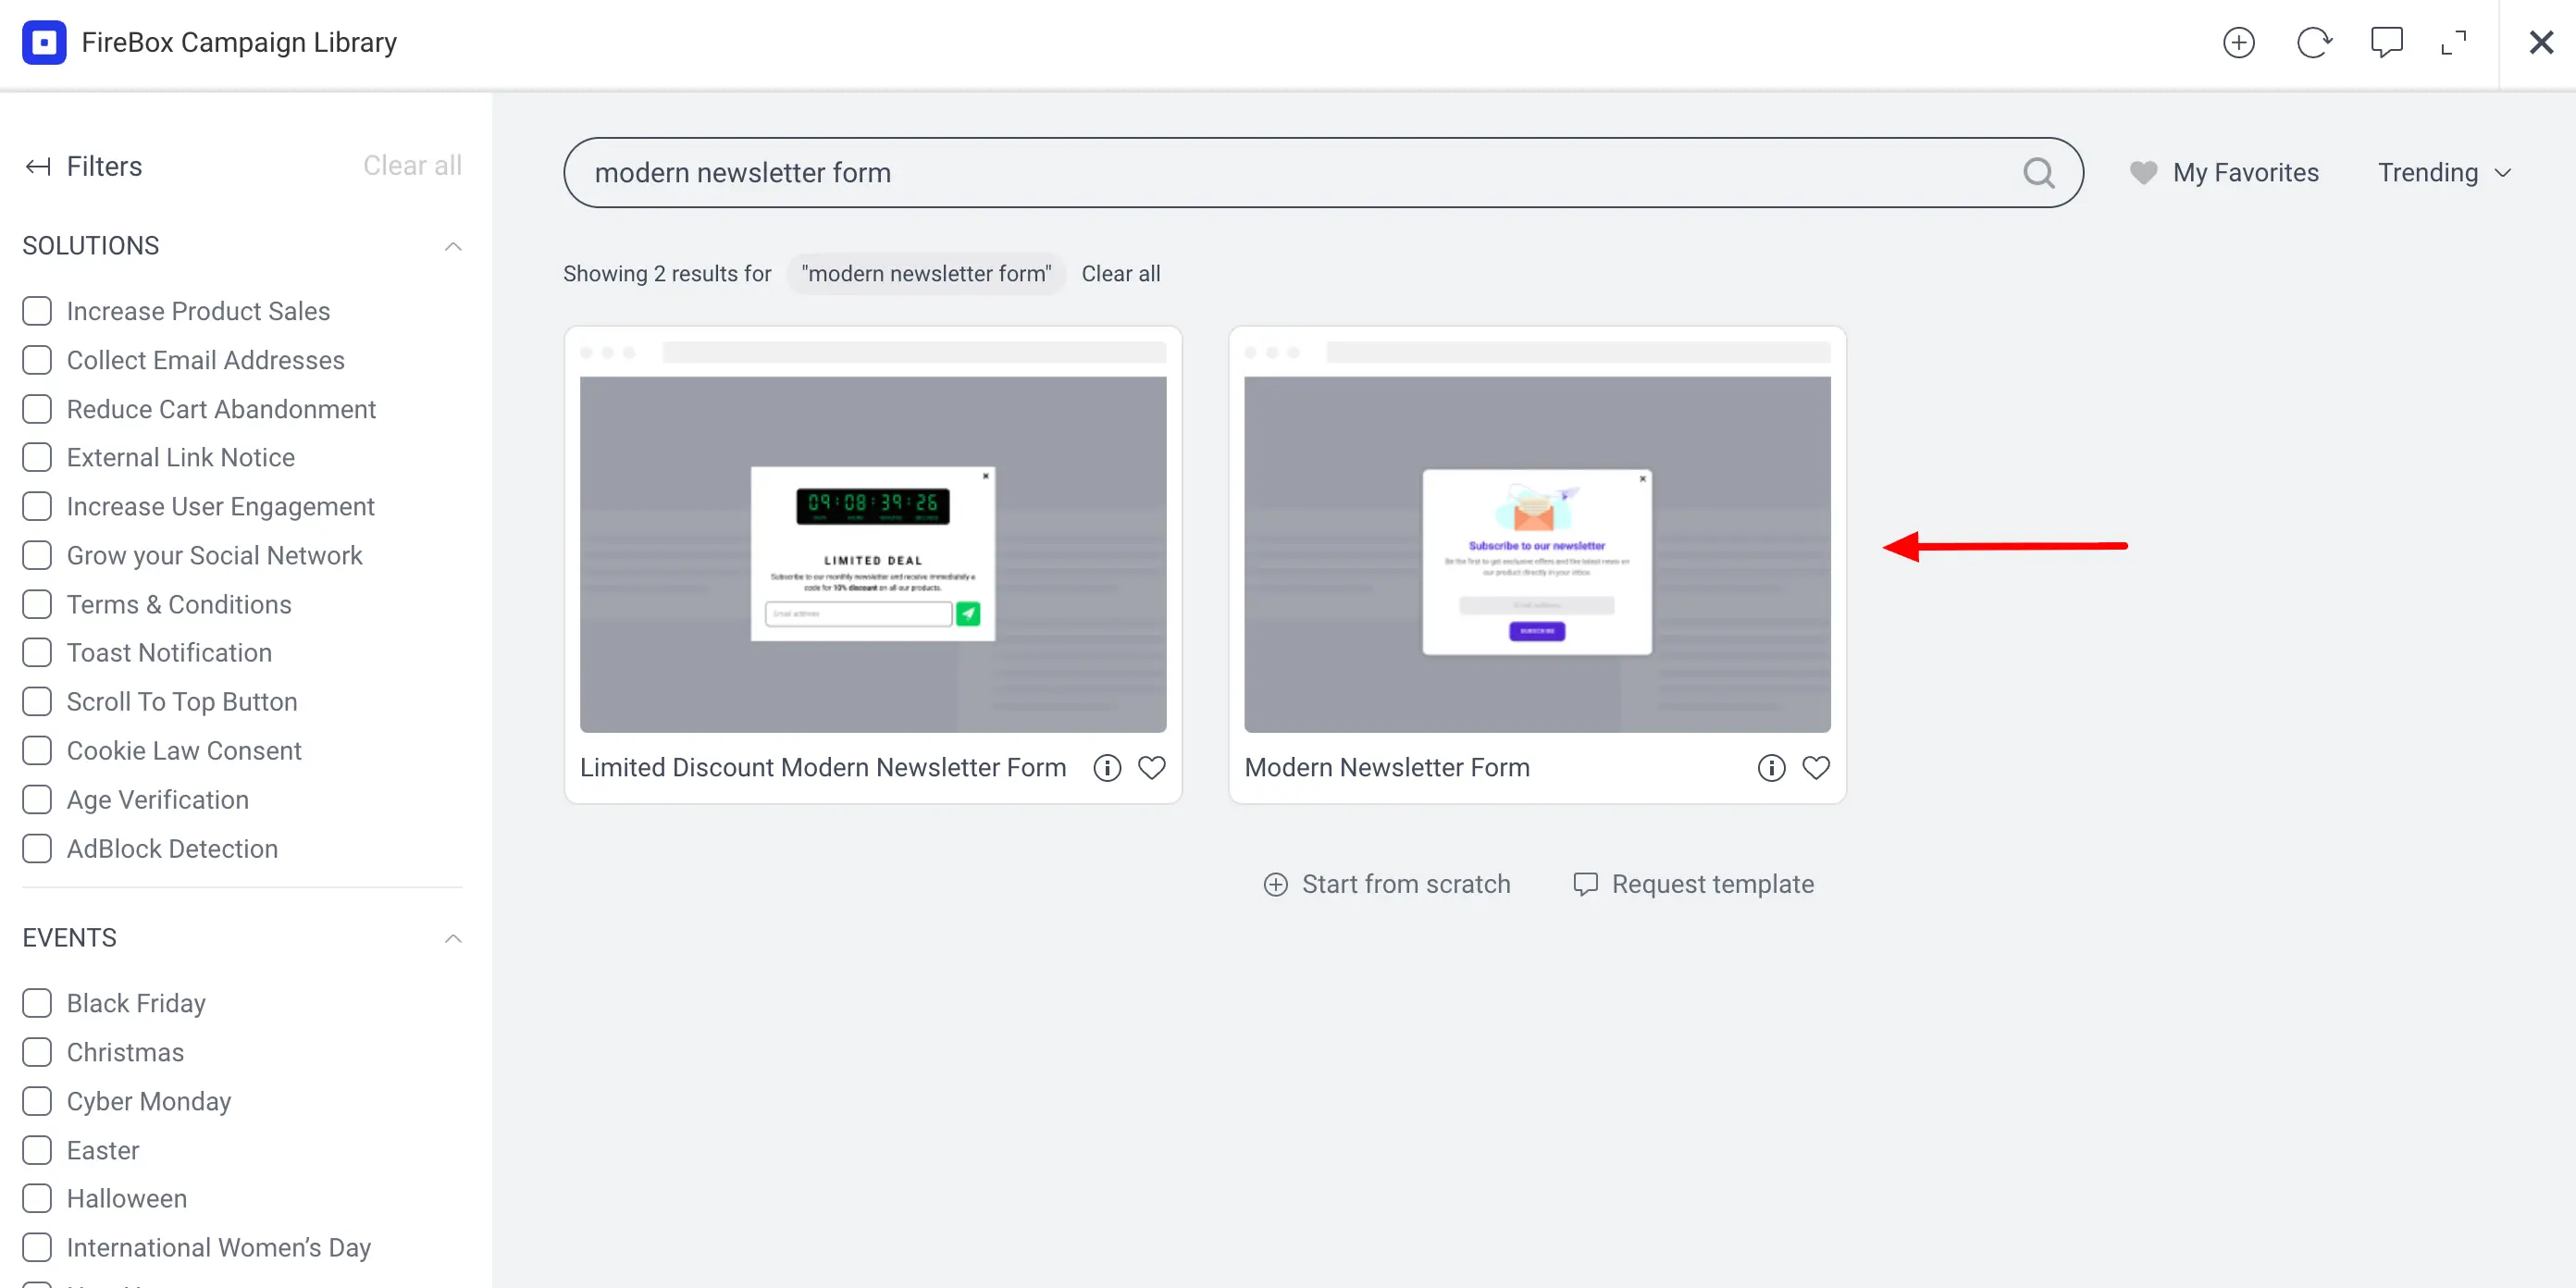
Step 3: Create a New Campaign and Select a Newsletter Template
Once FireBox is installed and activated, navigate to the FireBox plugin in your WordPress dashboard and click New Campaign. You’ll be presented with the FireBox Campaign Library containing various pre-made templates.
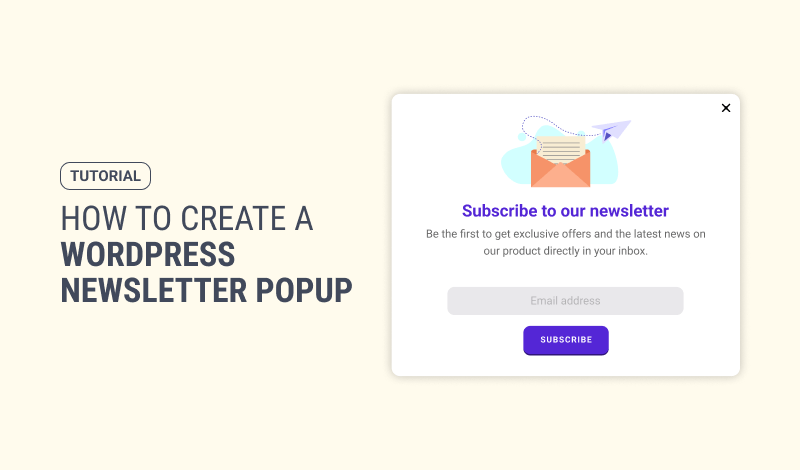
For our example, templates like the “Modern Newsletter Form” are ready-to-use options that provide a great starting point for your WordPress newsletter popup.
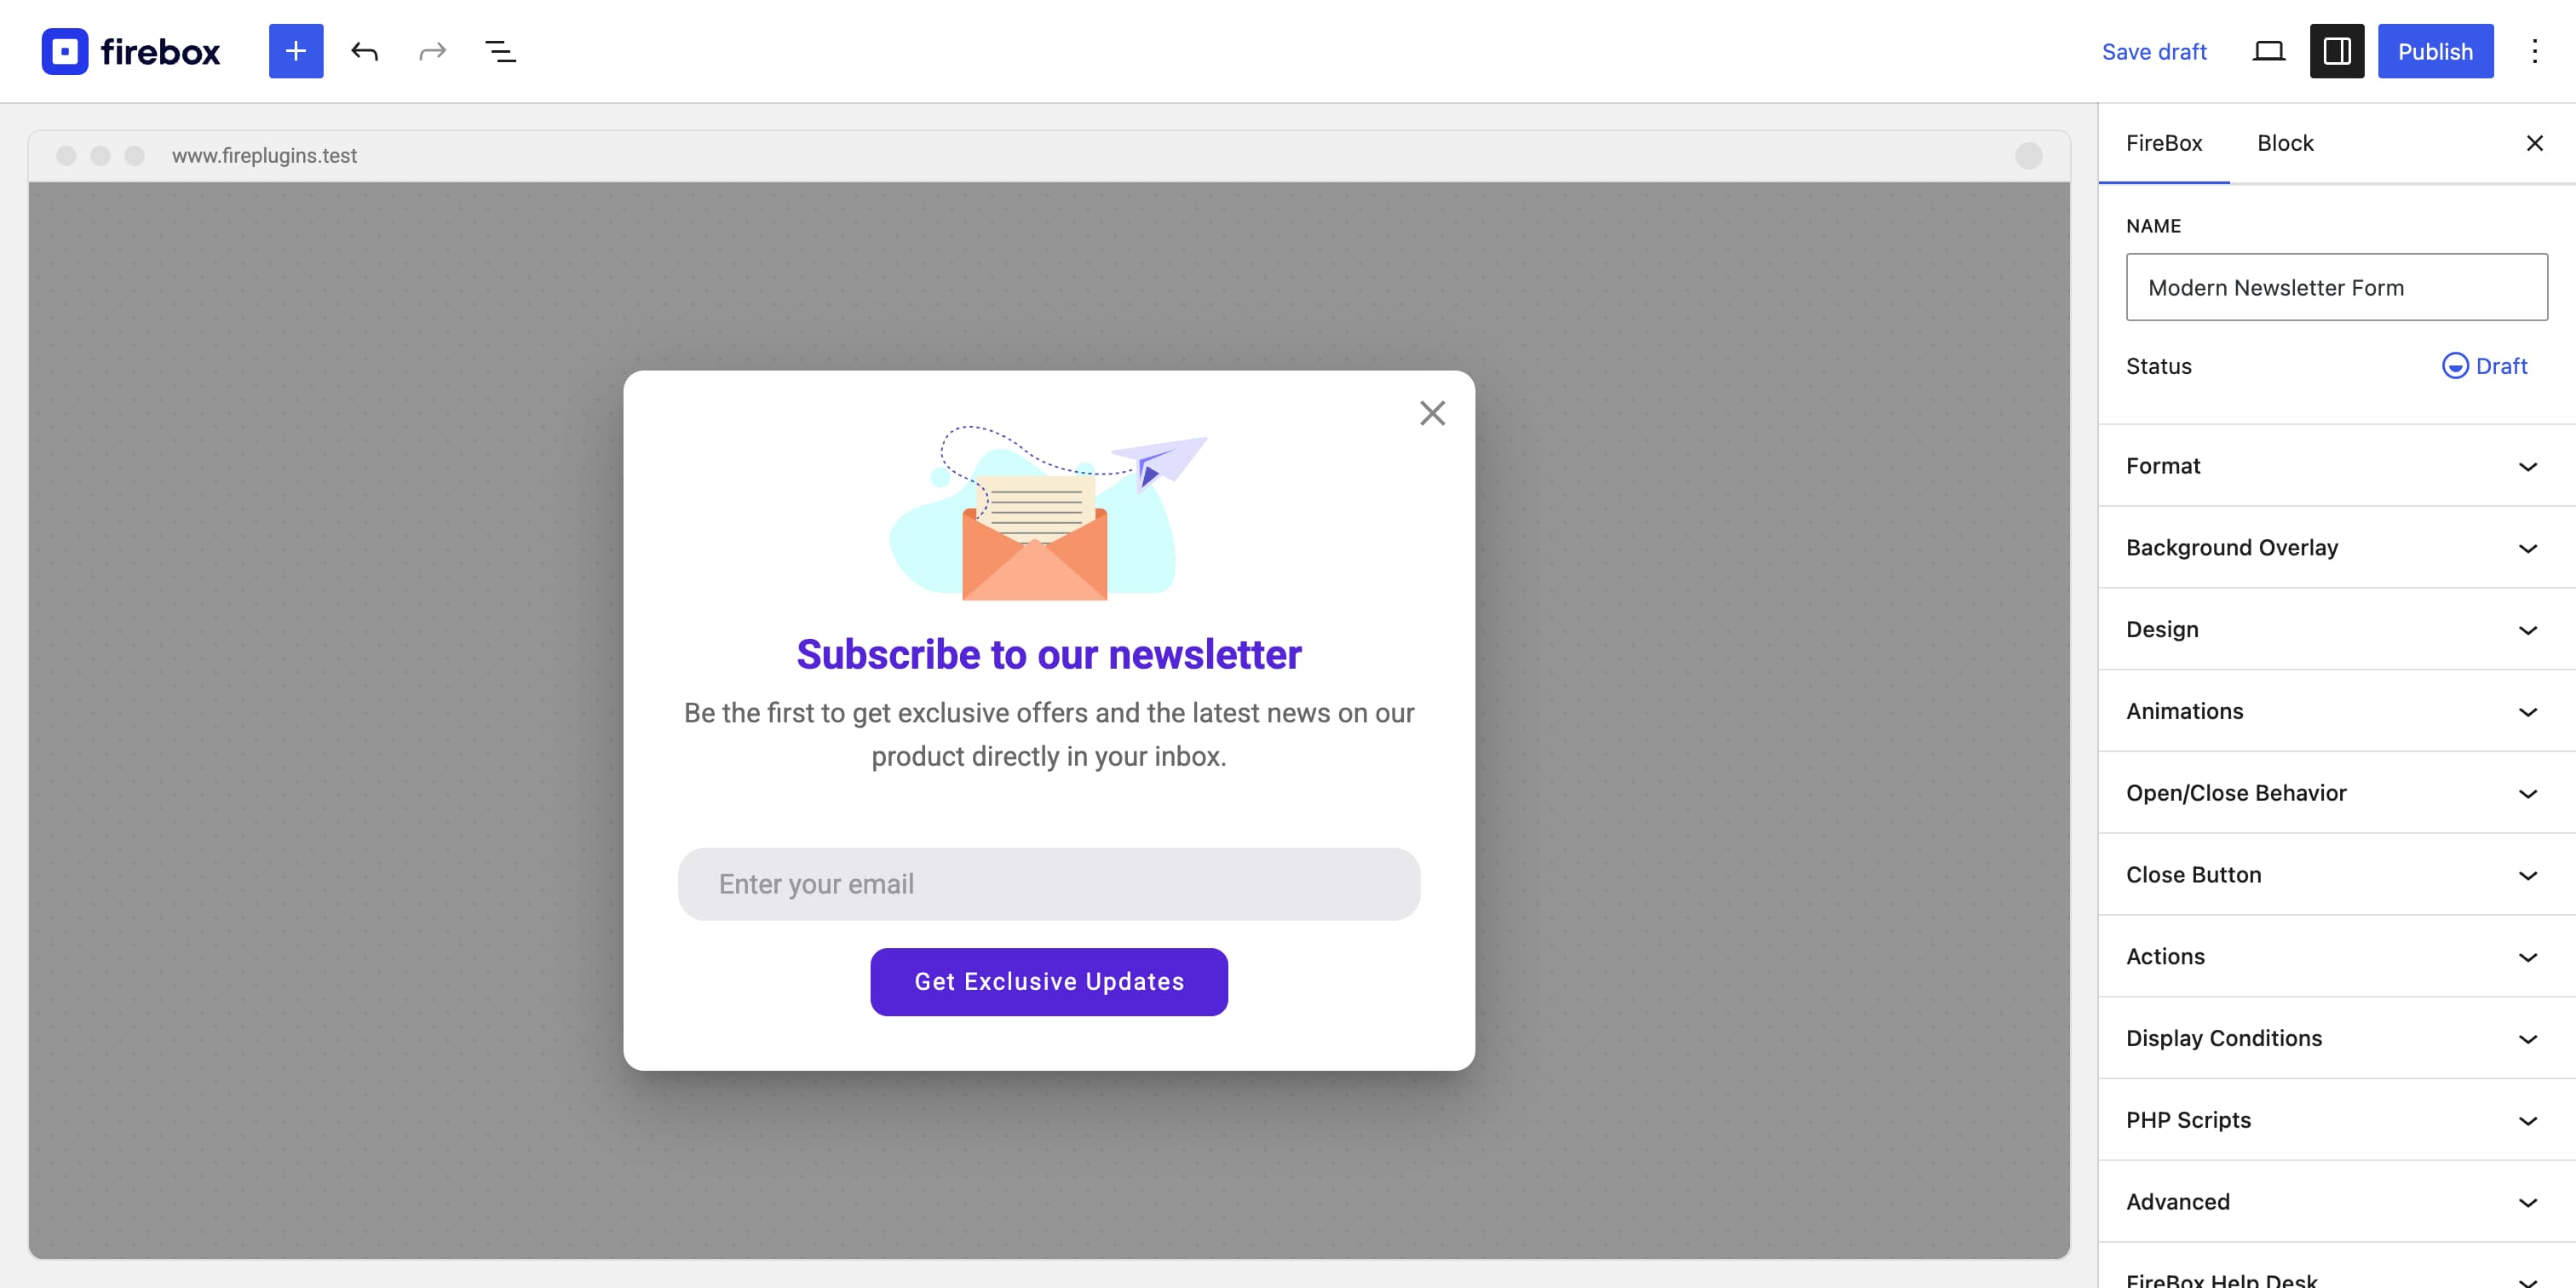
Step 4: Customize Your Newsletter Popup Design
After selecting a template, you’ll enter the FireBox campaign editor, where you can customize every aspect of your newsletter popup.
- Text & Imagery: Update the headline, body text, and any images to align with your brand and value proposition. Use persuasive language that highlights the benefits of subscribing.
- Form Fields: Keep your form concise. Typically, an email address field is sufficient. You can add a name field if necessary for personalization, but remember that limiting collected information can increase conversion rates.
- Call to Action (CTA): Make the subscribe button stand out with clear, action-oriented text (e.g., “Sign Up Now”, “Get Exclusive Updates”, “Claim Your Discount”).
- Design & Layout: Use the Design panel to adjust width, height, colors, padding, and background. You can even add animations or a blurred background overlay for a modern look, as explored in our guide on making blurred background popups.
Step 5: Configure Display Conditions and Triggers
This is where you can create an impactful newsletter popup that your WordPress visitors will notice. FireBox offers extensive display conditions and triggers to ensure your popup appears at the optimal moment without being intrusive.
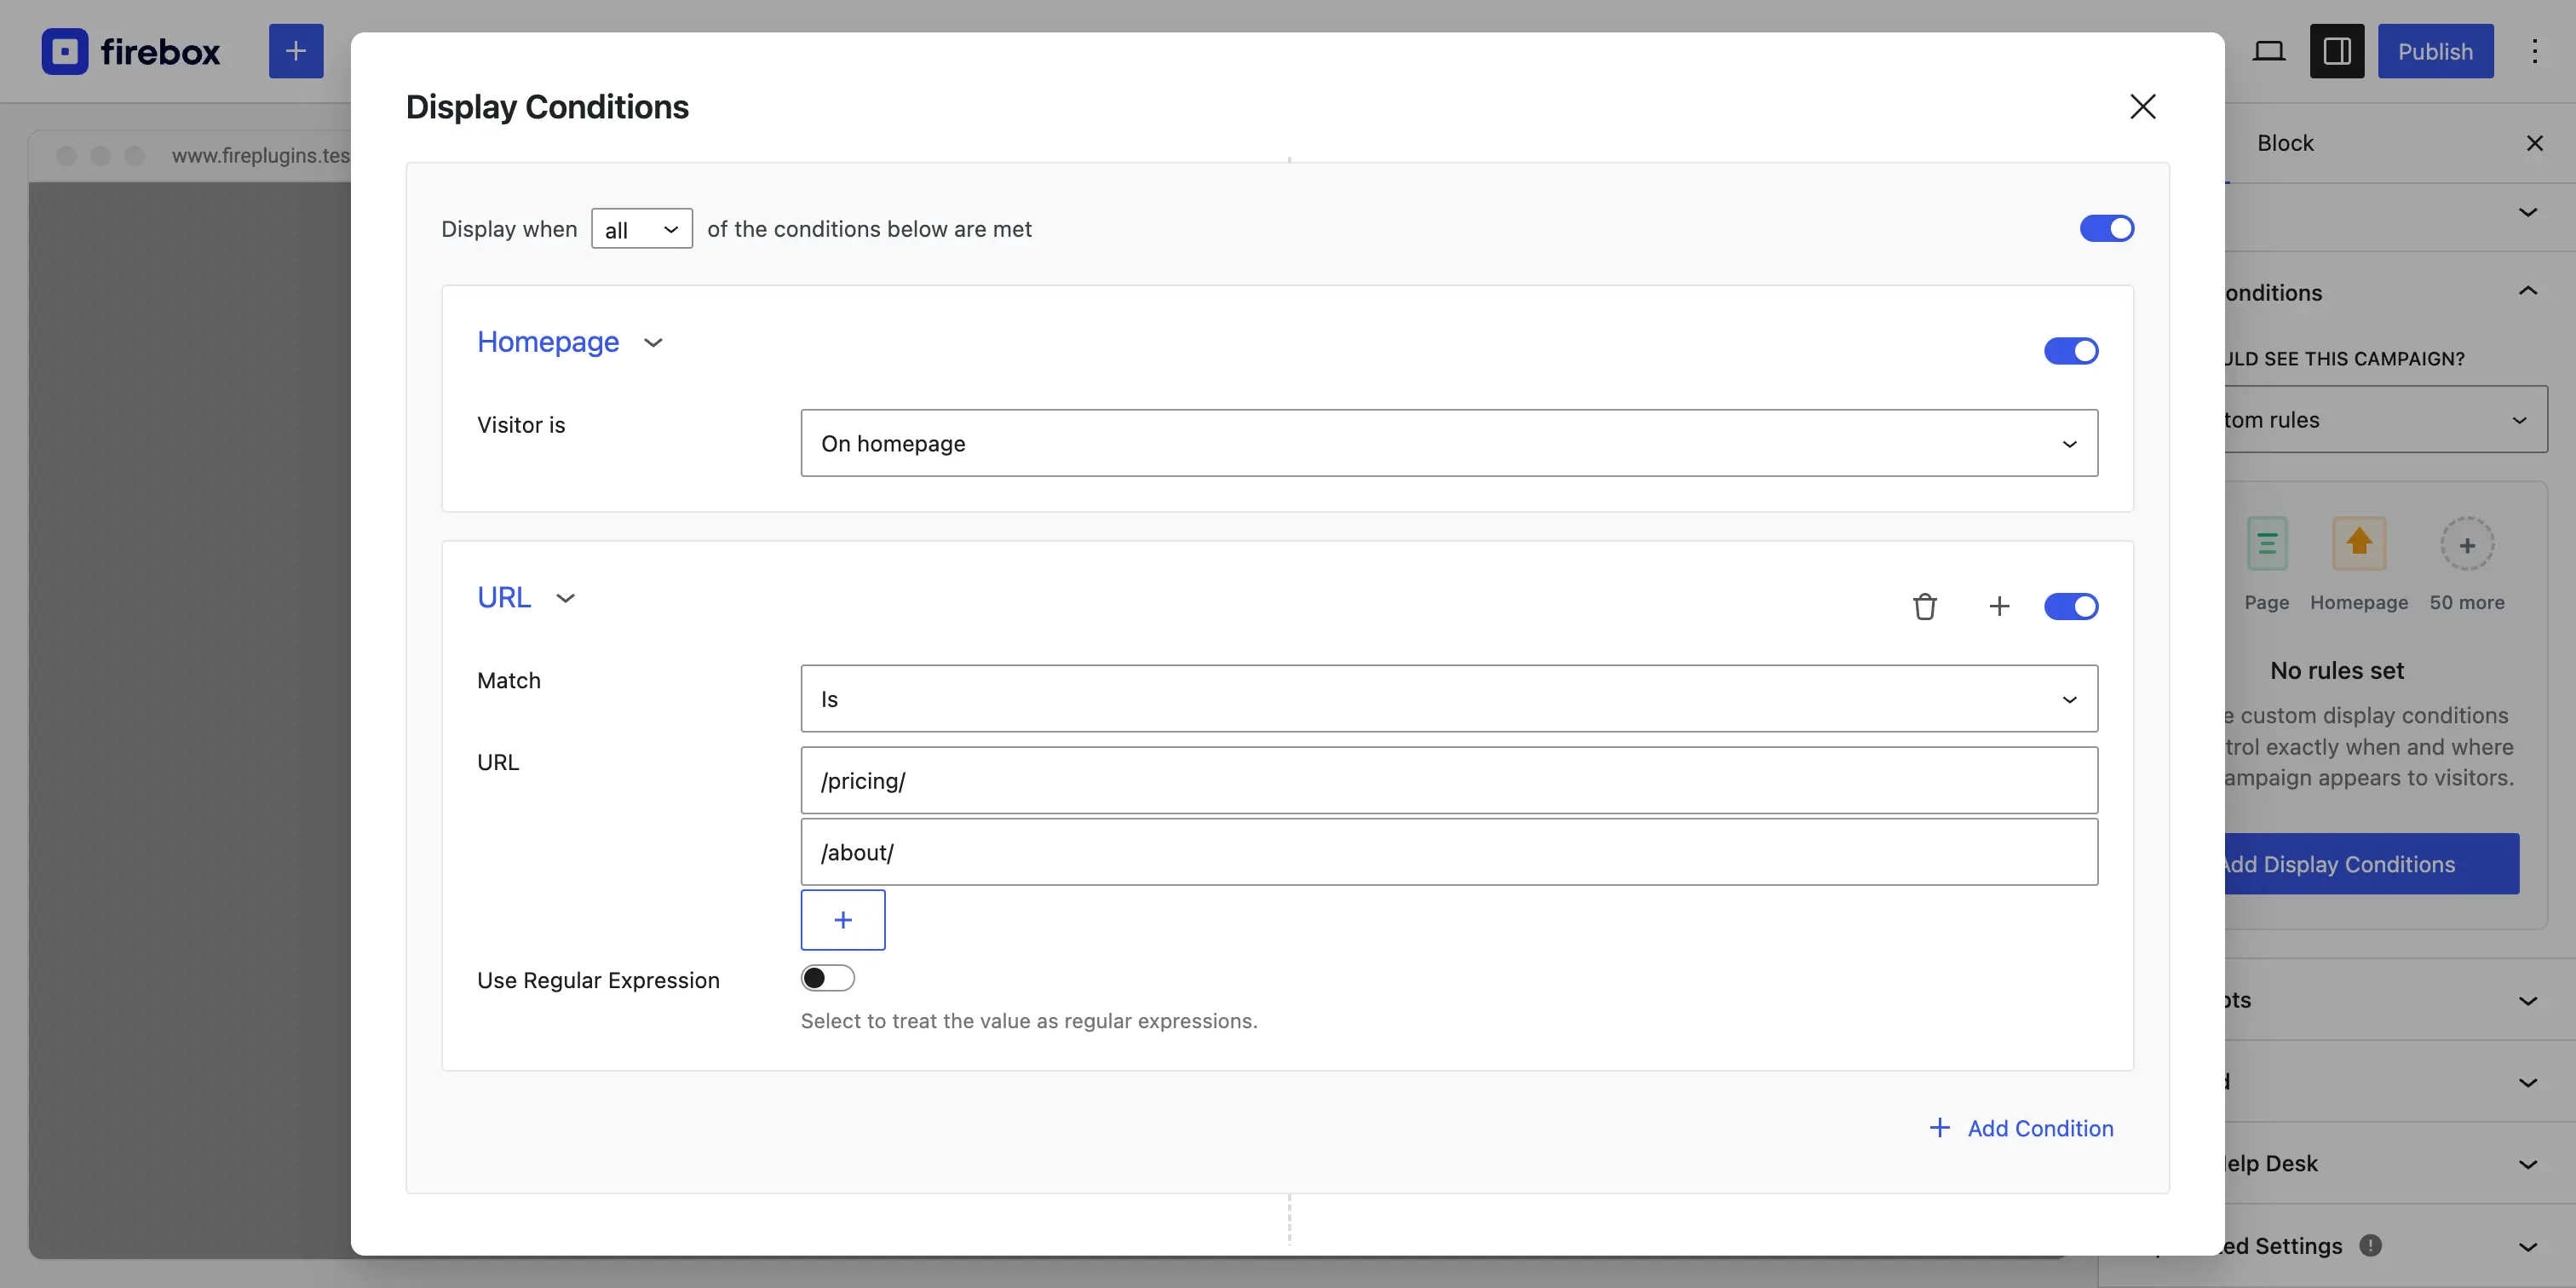
Common Display Conditions for Newsletter Popups:
- Homepage Condition: Target visitors specifically on your site’s homepage to maximize visibility for new arrivals.
- Page Condition: Display your newsletter popup on specific pages, like your blog or “About Us” page, where visitors might be more engaged.
- Post Category Condition: If you have a specific blog category related to updates or announcements, you can target posts within that category.
- URL Condition: Target or exclude specific URLs.
Triggers for Your WordPress Newsletter Popup:
- On Page Load: Display the popup after a short delay (e.g., 5-10 seconds) to give visitors time to engage with your content first.
- On Scroll: Trigger the popup when a user scrolls a certain percentage down the page (e.g., 50% or 70%), indicating interest. This is a highly effective method for blog content.
- Exit-Intent: Catch visitors just as they are about to leave your site, offering a last chance to subscribe. This is one of the most powerful strategies for email acquisition.
- Floating Button Trigger: A discreet button can be placed in a corner of your site that, when clicked, triggers the newsletter popup. This user-initiated approach is less intrusive.
By combining these conditions and triggers, you can precisely control who sees your newsletter popup and when, significantly boosting your opt-in rates.
Step 6: Integrate with Your Email Marketing Service
Collecting emails is just the first step; you need a way to store and manage them for your email campaigns. FireBox allows you to integrate with popular email marketing platforms like Mailchimp, Brevo, AcyMailing, or even connect with 8,000+ Zapier apps.
After designing your form, go to the form block settings in the FireBox campaign editor, locate the Actions panel, and enable the integration for your chosen service. You’ll typically need to enter an API key and select which audience list your new subscribers should be added to. This ensures that new sign-ups from your WordPress newsletter popup are automatically synced with your email marketing platform.
Connect Your Audience Integrate your WordPress newsletter popup with Mailchimp or Brevo to automate list growth and email campaigns.Step 7: Manage Submissions and Set Up a Thank-You Message
FireBox stores all form submissions in your site’s database, accessible via FireBox → Submissions. Here, you can review and export your subscriber list.
It’s also crucial to provide a positive experience after a successful signup. In the form block settings, configure a “Success” message to display confirmation. Optionally, you can redirect users to a “Thank You” page or provide access to a lead magnet, such as a free ebook, as a reward for subscribing. This helps reinforce the value of signing up for your newsletter popup.
Best Practices for a High-Converting Newsletter Popup in WordPress
To ensure your newsletter popup in WordPress delivers optimal results, keep these best practices in mind:
- Offer an Incentive: A discount, an ebook, exclusive content, or early access can significantly increase sign-ups.
- Test Different Placements: Experiment with where your popup appears (center, slide-in, sticky bar) to see what performs best for your audience.
- A/B Test Variations: Test different headlines, images, CTA buttons, and even the incentive itself. Small changes can lead to significant improvements in conversion rates.
- Mobile Responsiveness: Ensure your newsletter popup looks and functions perfectly on all devices.
- Avoid Over-Interruption: Use frequency settings to prevent the same popup from appearing too often to the same visitor, which can lead to a negative user experience.
- Keep Forms Short: Only ask for essential information (usually just the email address).
Measuring the Success of Your Newsletter Popup Campaigns
Once your newsletter popup is live, continuously monitor its performance to make data-driven improvements. Track key metrics such as:
- Views: The total number of times a campaign has been seen by your website visitors.
- Conversions: The total number your form has been submitted (email addresses collected).
- Conversion Rate: The percentage of visitors who see the popup and subscribe.
Analyzing this data will help you understand what’s working well and what needs adjustment in your WordPress newsletter popup strategy.
Conclusion
Creating a newsletter popup in WordPress is a powerful way to grow your email list and build a loyal audience. By leveraging tools like FireBox, which offers intuitive design options, smart targeting conditions, and email marketing integrations, you can create popups that convert visitors into valuable subscribers. Start building your high-performing newsletter popup today to enhance your communication strategy and drive long-term business growth.
Get FireBox for Free
Enter your WordPress website URL to install instantly.
Trusted by 9,000+ users

0 Comments