

Looking for a simple way to add a WordPress login popup modal on your site? A login modal enhances your visitors' login process by allowing them to log in directly to the website without leaving the currently navigating page. In this tutorial, we'll show you how to create a WordPress login popup modal step by step.
How Is a WordPress Login Popup Modal Beneficial?

A WordPress login popup modal helps you eliminate the default login page in WordPress. If you have a membership website, sell online courses, or run an eCommerce site, your buyers must register/log in to complete their purchase.

Generally, when users click on the login link in WordPress, they are redirected to the default WordPress login page or the custom login page set up by the site owners. After completing the login process, users are again redirected to another web page. This typical multi-step WordPress login process redirects users from one page to another.
A custom WordPress login modal simplifies this tedious process and removes the need for a separate login page on WordPress sites. For instance, you can display a popup window and allow visitors to log in directly to your site without visiting any additional pages.
Furthermore, a WordPress login form popup allows you to add a login/register link anywhere on your website, including the sidebar, footer, or header. Thus, you can let your website's visitors log in without making them leave the page they're on.
Obviously, providing your prospective buyers with a much simpler and faster login process enhances their site navigation and buying experience, ultimately boosting sales and higher conversions. Indeed, a login popup modal is different from the other popular popup types. However, if built correctly and used precisely, a login form popup can also be leveraged as an effective marketing tool.
Let's now see how to create a login popup modal in WordPress.
How to Create a WordPress Login Popup Modal
We've looked at what a WordPress login popup modal is and how it will help improve your visitors' site navigation experience. We will now create our WordPress login popup, and the following steps will guide you through this process. For our tutorial, we'll use a free WordPress Gutenberg plugin – FireBox.
FireBox is the best WordPress popup builder based on the modern WordPress editor Gutenberg. This plugin helps you create popups that don't scare off your visitors and convert them into email subscribers & paying customers. You can build interactive popups, modals, floating bars, fullscreen overlays, slide-ins, and many more without hustling with any code and custom CSS.
FireBox also offers many pre-built popup templates, including the login form template. You need to insert the template, customize its look, and set the trigger points, and you're done! By default, FireBox's login popup template is configured to get triggered on Page Load. You can select a different trigger point to display the login form popup when a certain link or button is clicked on a page.
So, without any further ado, let's get started!
Step 1: Install and Activate the FireBox Plugin
First, you'll need to download, install, and activate the lite (free) version of the FireBox plugin.
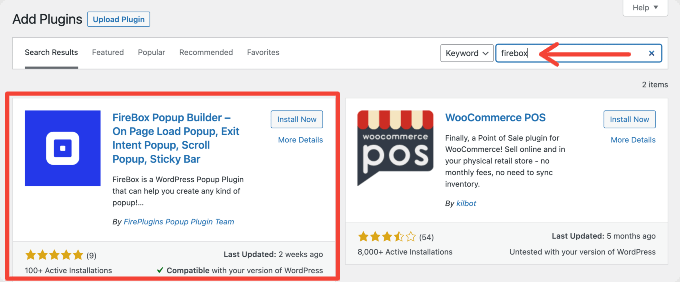
Go to your WordPress admin area for installation and click Plugins > Add New.
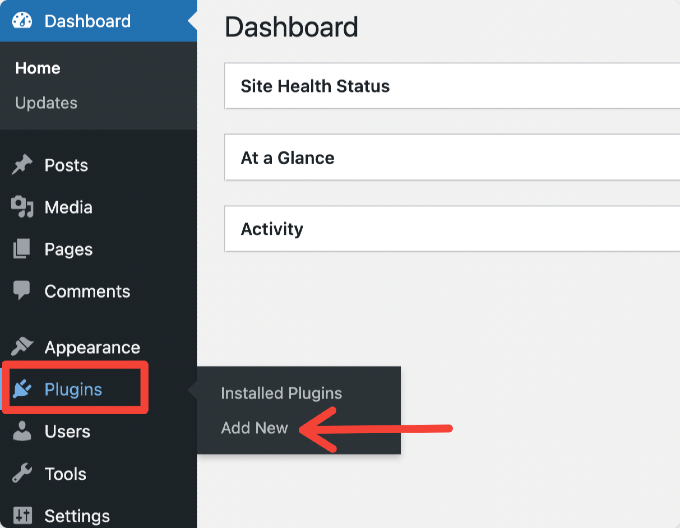
Next, type FireBox in the search bar, and once the plugin appears, click on the Install Now button next to it.
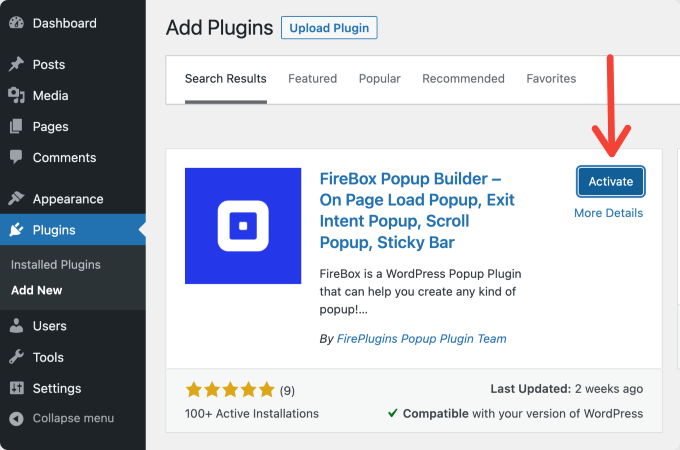
Once the installation is complete, hit the Activate button to use the FireBox plugin on your WordPress website.
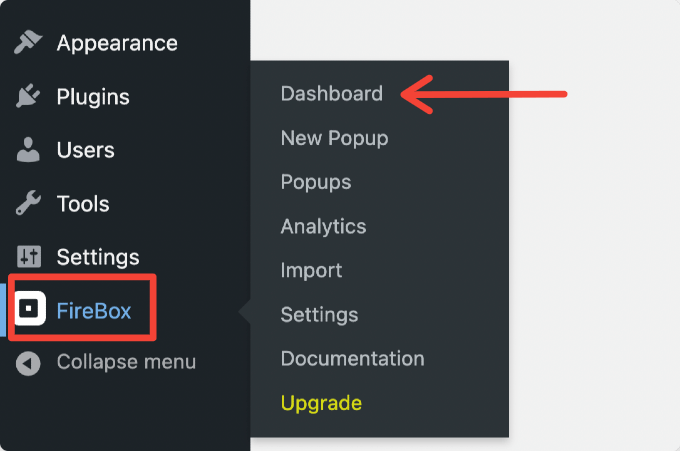
After successfully installing and activating the plugin, you will see a new menu entry named FireBox in your website's left sidebar.
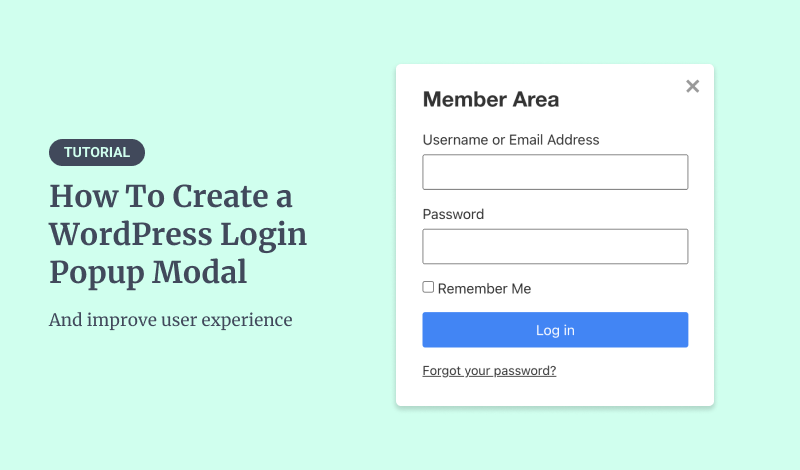
Step 2: Select Popup Login Form Template
To add a modal popup login form to your WordPress, navigate to your site’s dashboard menu and click FireBox > Dashboard.
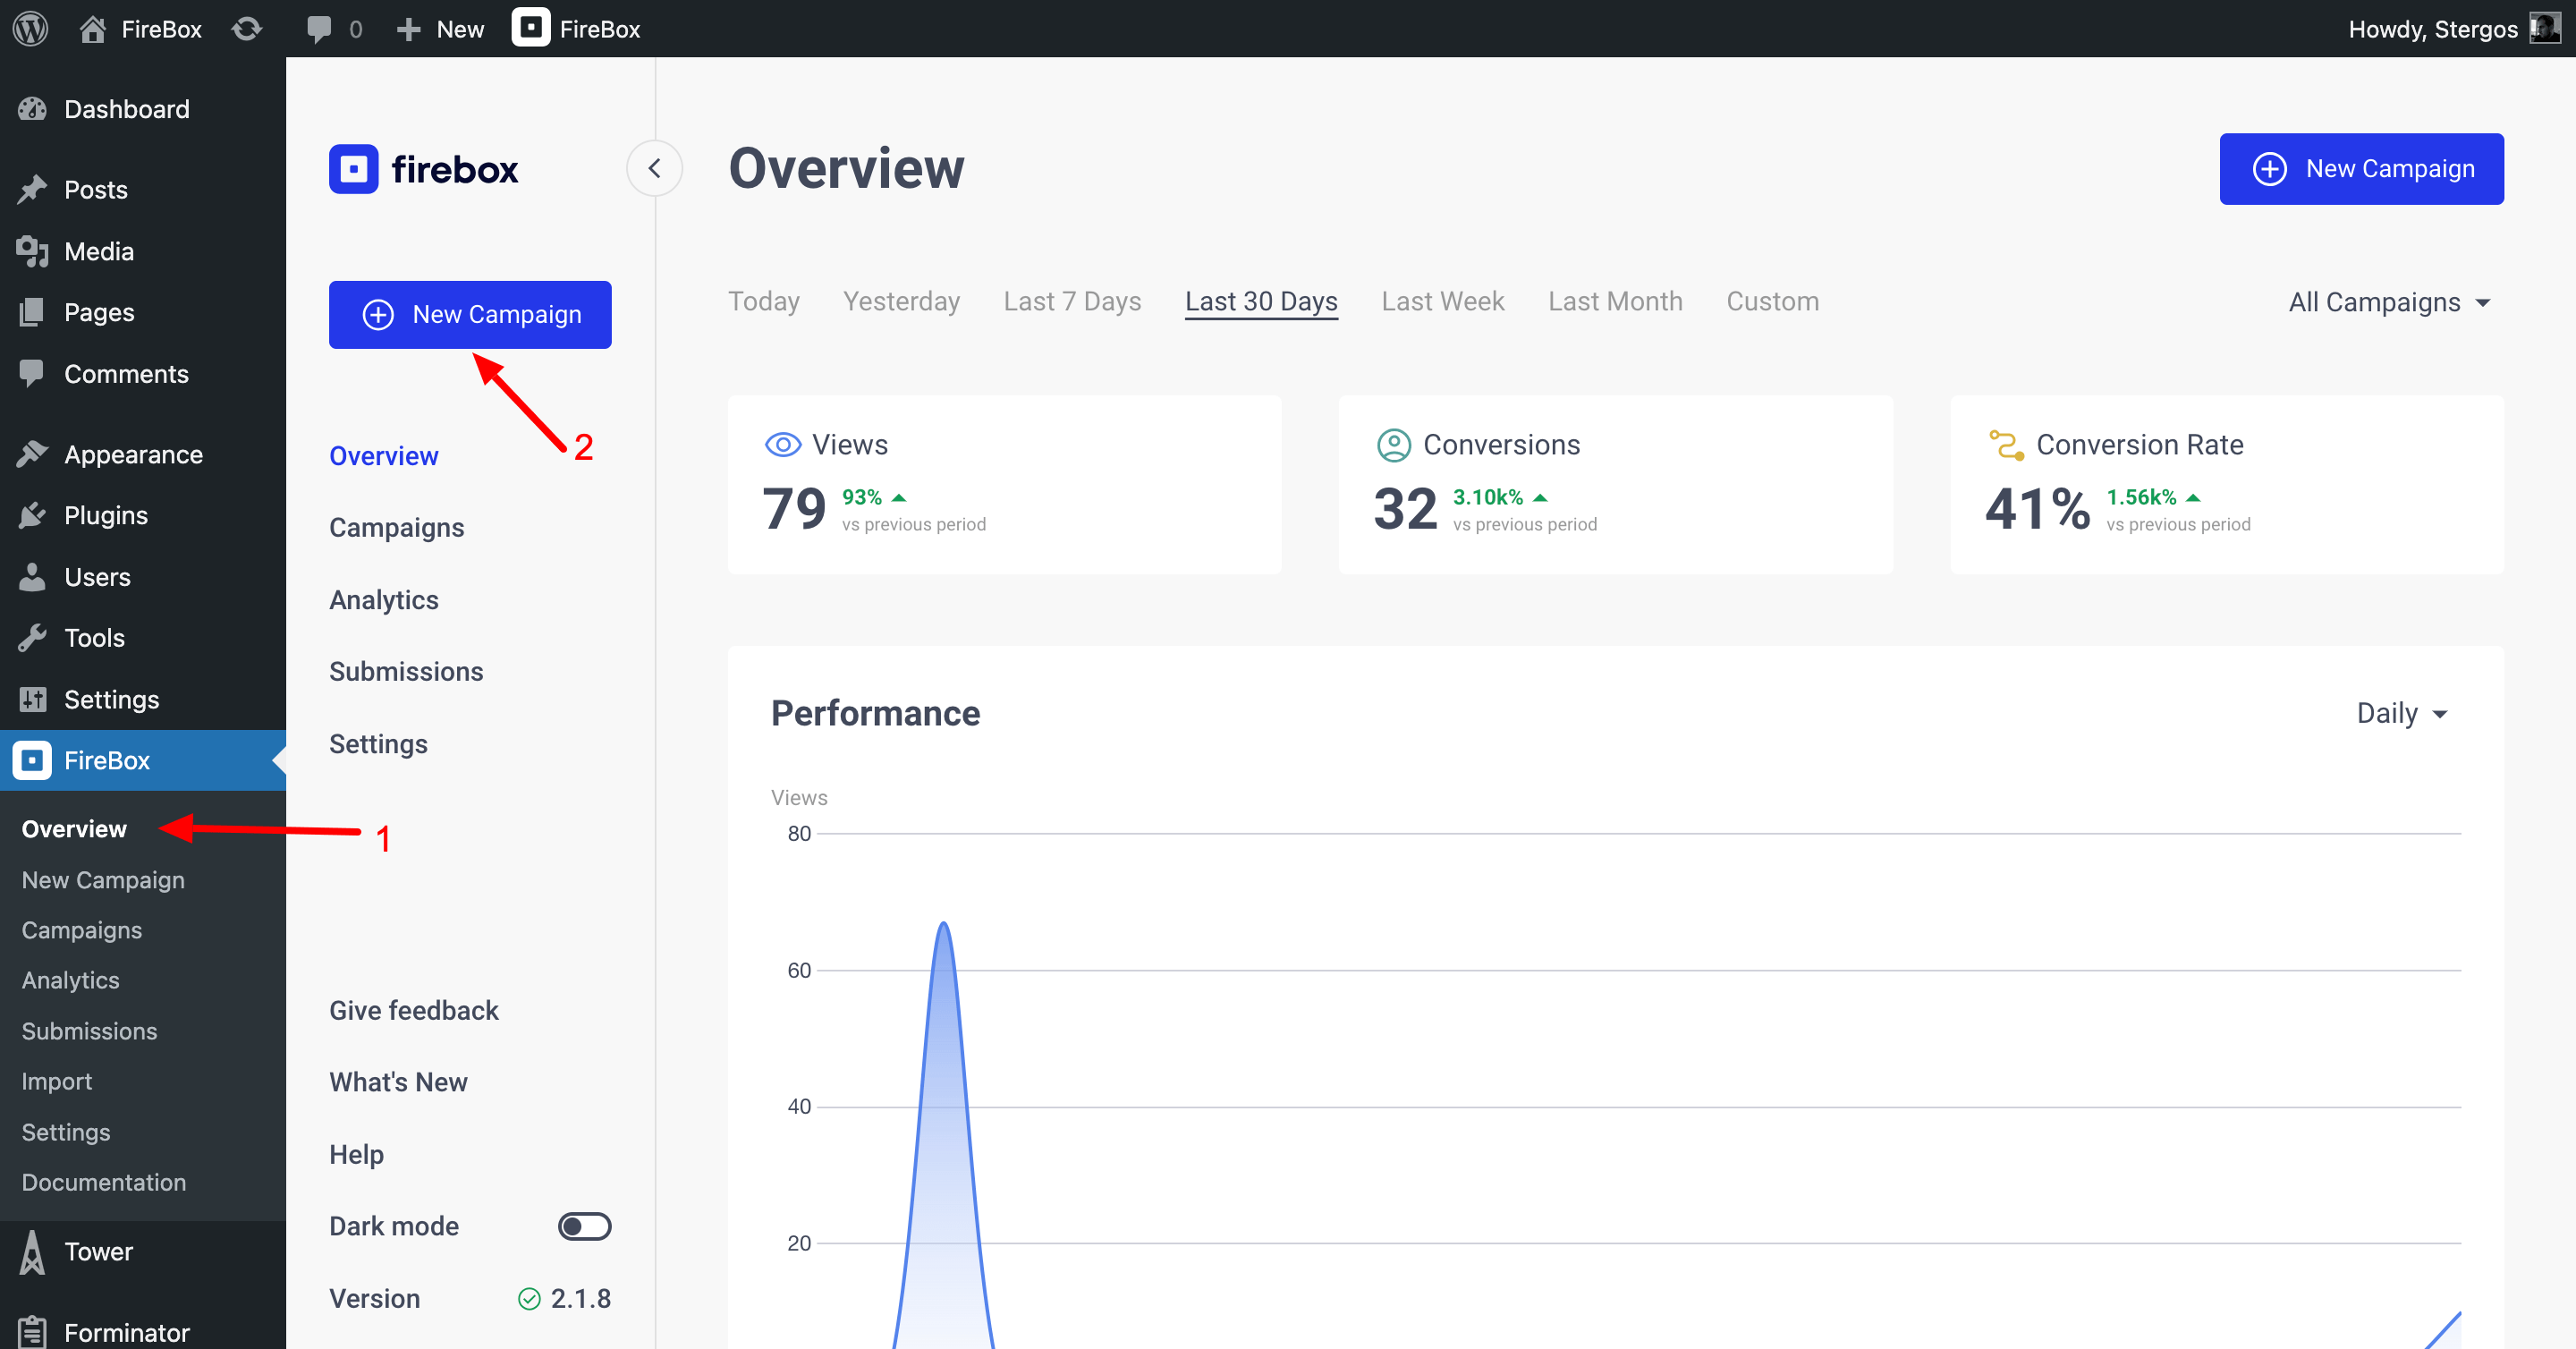
This will take you to the FireBox dashboard. At the top of the page, click New Campaign.
Clicking the tab will open the FireBox popup template library. Search for login and select the Popup Login Module template.
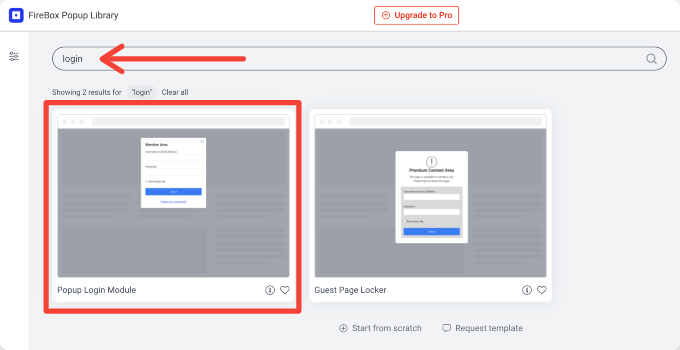
Using the Preview button in the center, you can also live preview the template and check how it will look on different device types.
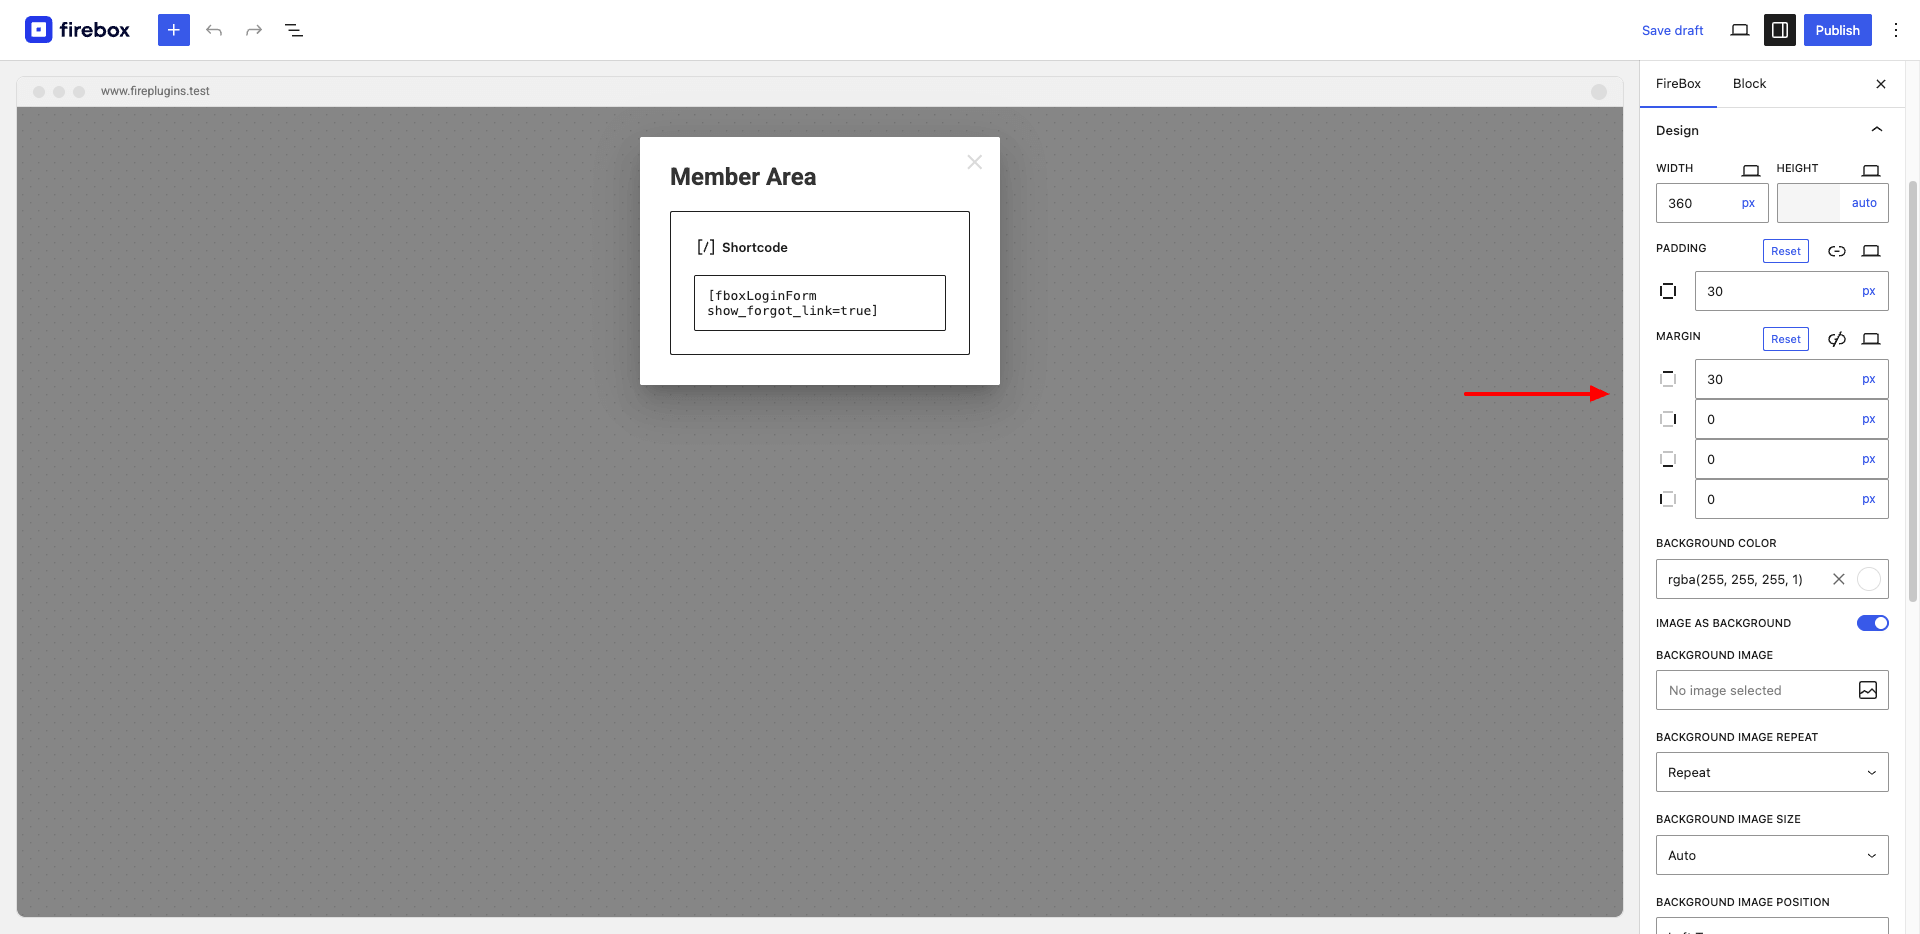
Step 3: Configure FireBox Settings
After inserting the login form template, you'll find different panels on the right-hand side of the FireBox campaign editor allowing you to customize your campaign. You can tweak various popup aspects, such as its design, behavior, actions, display conditions, and other advanced options. For example, in the Design Panel, you can configure the login form popup's size, color, margin, and more!
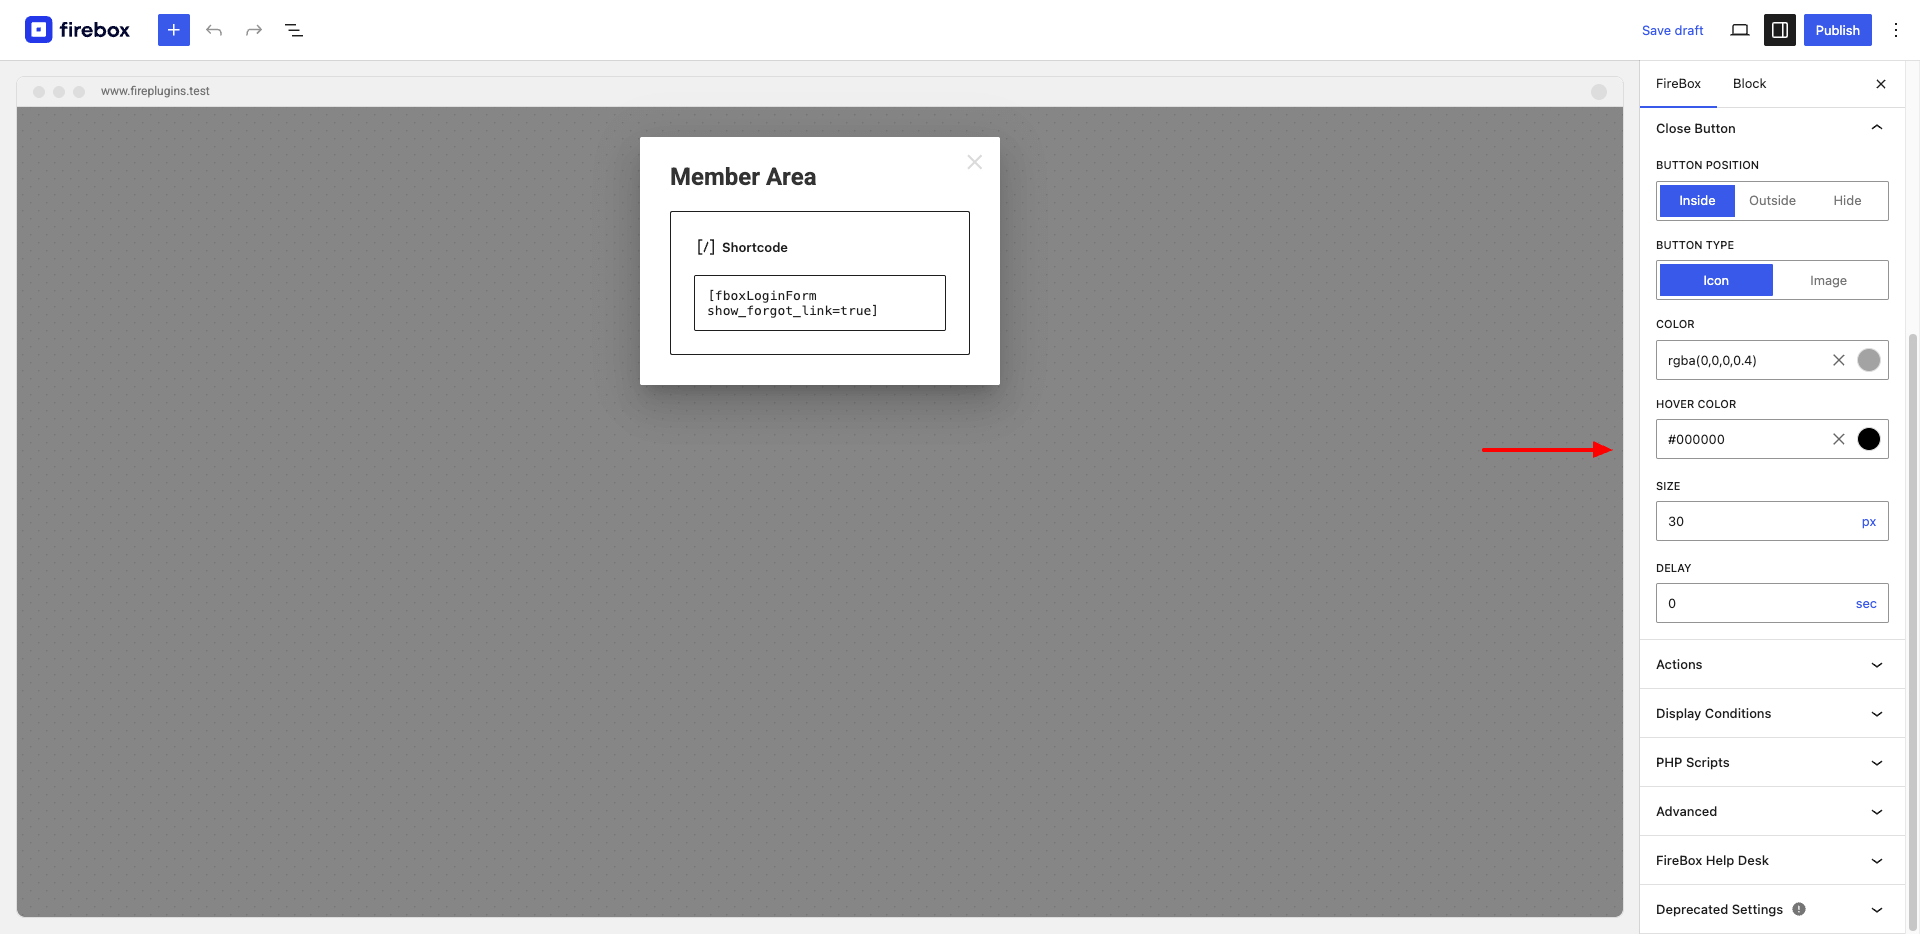
You can even style the Close Button via the Close Button Panel by customizing its size, color, and hover color.
These are some of the design options you get with FireBox. Explore these features and more to customize your login form popup according to your needs.
Since we're creating a WordPress login popup modal here, setting the right triggers is essential so the login form popups at the right time.
Move to the next step to set up the login form trigger.
Step 4: Select the Trigger to Open a Login Form Popup on a Button Click
To choose your popup trigger type, navigate to the Format Panel and scroll down the page to Trigger.
As mentioned, the login form template is by default configured to trigger on Page Load. We need to build a login popup that opens on a Button Click.
For that, select the Click or Manually trigger option from the displayed trigger points.
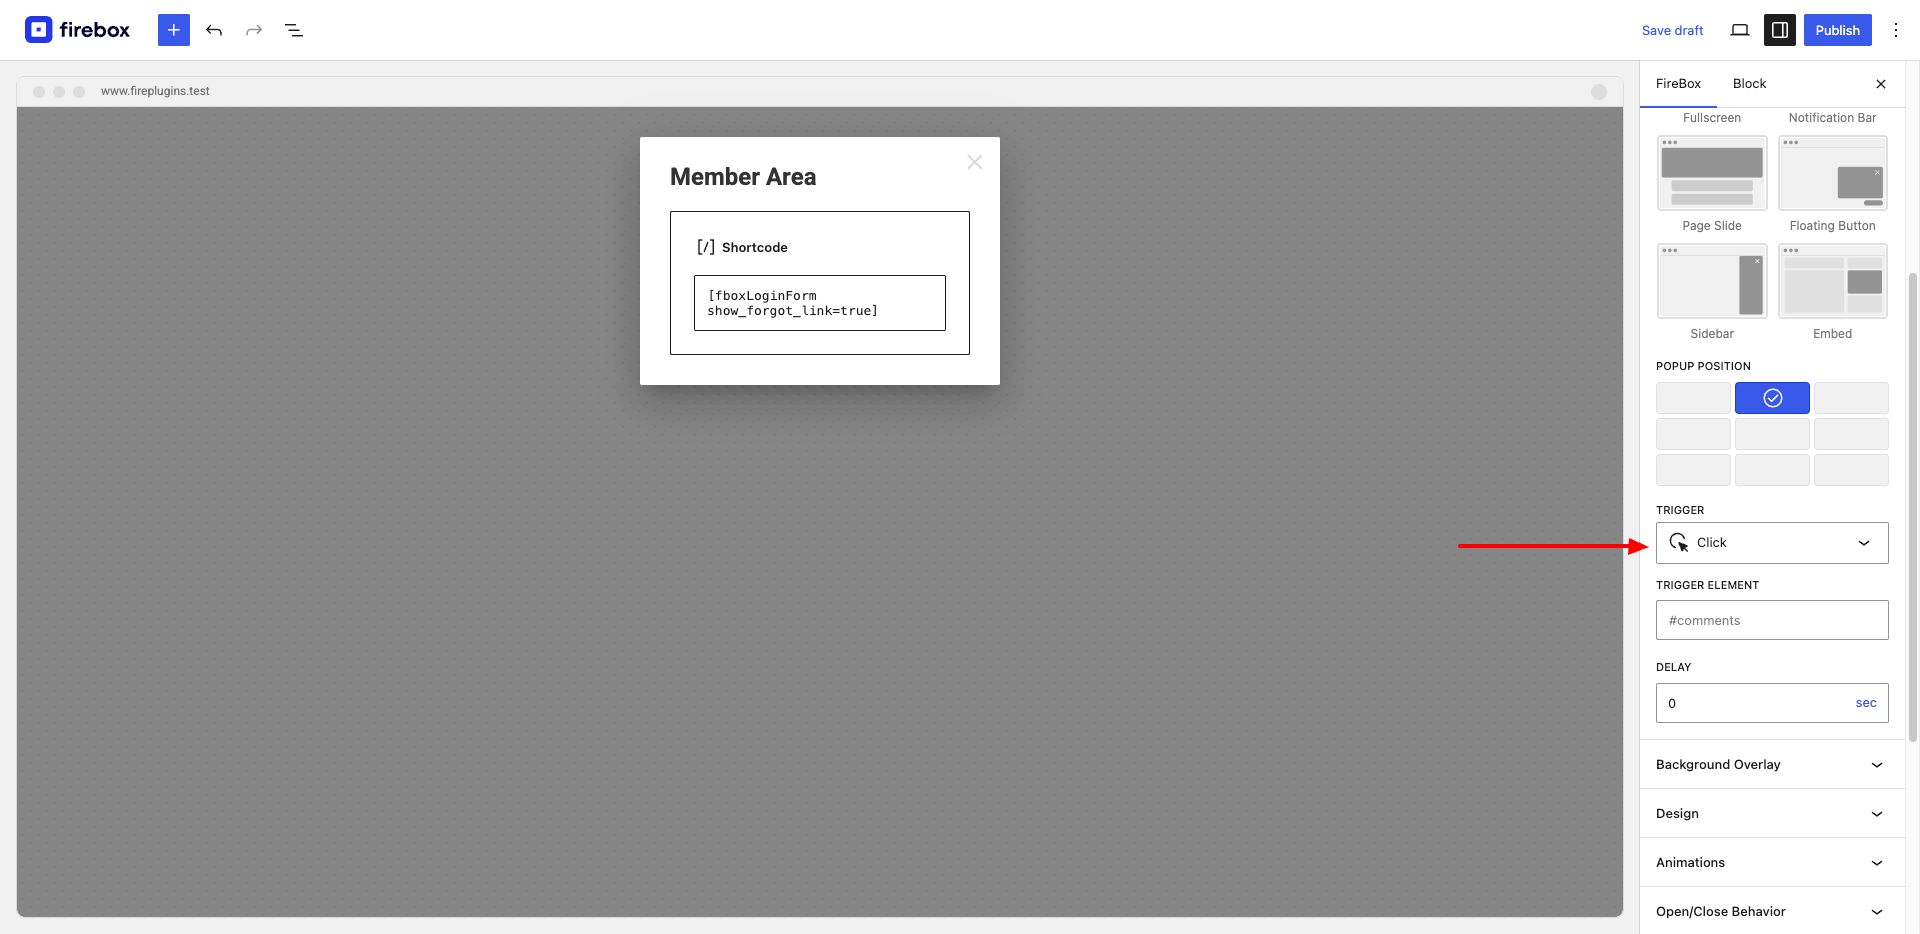
By selecting this trigger option, the login form popup will only be triggered when we click on specific elements on the page, such as a button or even via JavaScript code.
The next step is to define which element (button or link) will trigger this popup. To learn more details on how you can properly display a popup on a button click in WordPress, check out our How to Create a Popup That Opens on a Button Click in WordPress tutorial.
After properly configuring your login form popup campaign settings, remember to hit the Publish button!
Step 5: Add Your WordPress Login Form Popup to Your Website
That's it! You've successfully created your first WordPress login popup modal. Now, it's time to add a link or a button to the page to trigger the login form popup.
Open the WordPress page/post where you want to add the login form popup modal. Then, add a Buttons block, and name it as you desire.
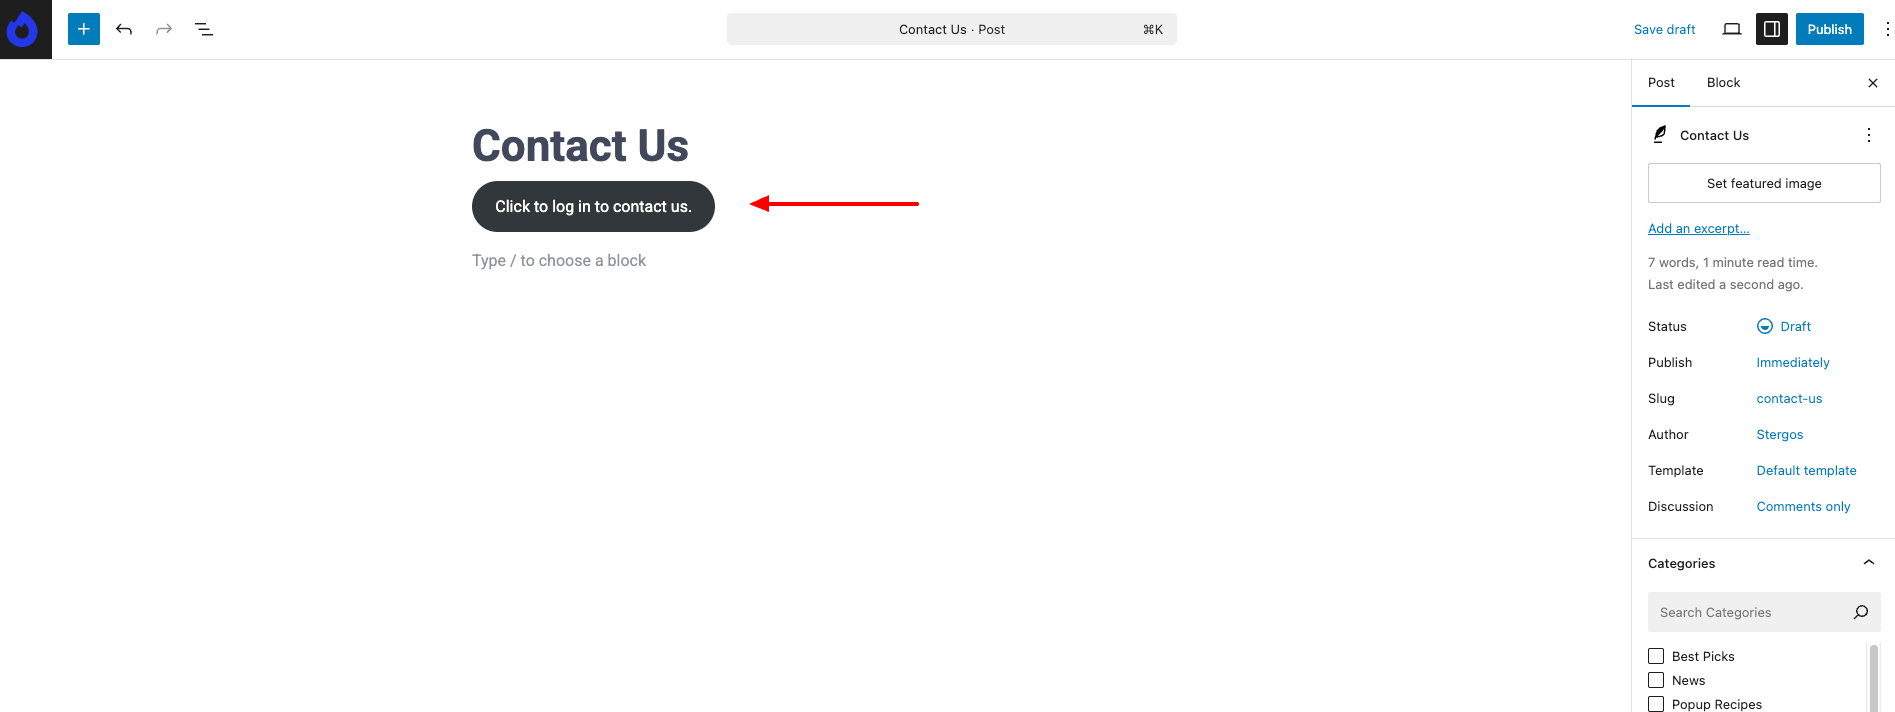
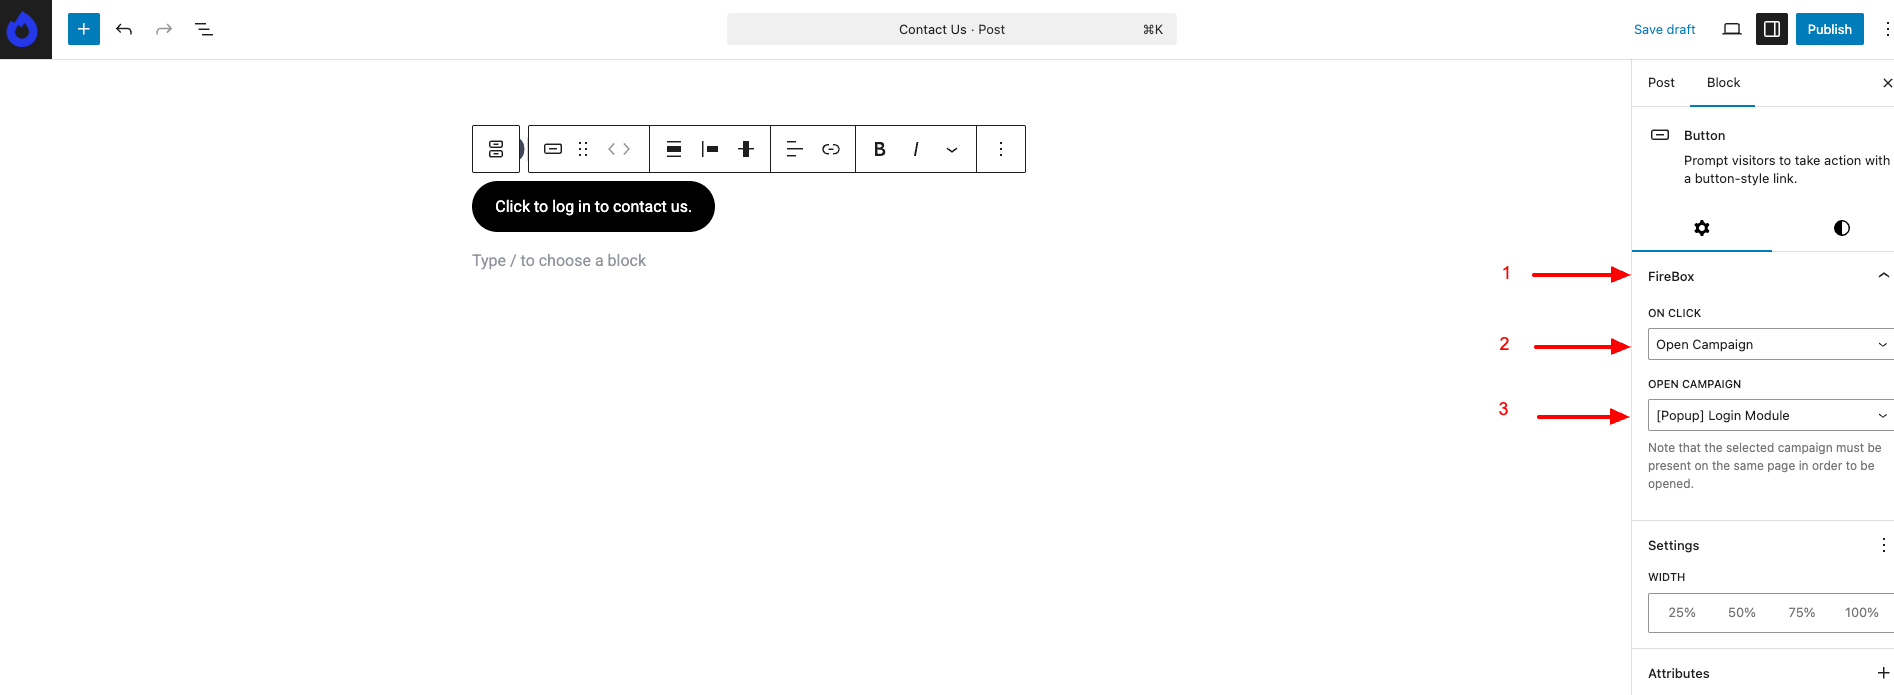
Next, select the button and from the right-hand sidebar, under the "FireBox" panel, select "Open Campaign" under On Click and select the Login Module popup we just created under Open Campaign.
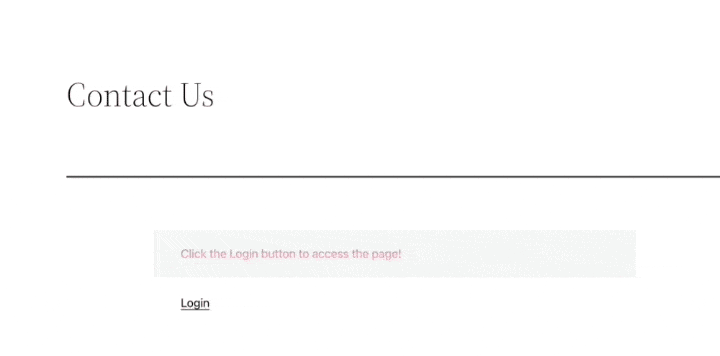
Step 6: Test Your WordPress Login Popup Modal
Finally, test your login form popup to ensure it works properly.
To test this out, open the page on your site's front end, fill out your login form, and submit.
Note: Test the login form popup in another browser or incognito window where you haven't logged in as an admin on your site
Create Your WordPress Login Form Popup Now!
I hope this tutorial helps you learn how to create your first login popup modal in WordPress. Next, if you want to showcase an interactive sticky floating bar, check out our detailed guide on how to create a sticky floating bar in WordPress.
FireBox comes with both Pro and Lite packages. You can create some basic WordPress popups using the free version, while the premium version of FireBox opens more powerful and advanced features. Click here to get your FireBox plugin now!
Please let us know in the comments section below if you encounter any problems while building the FireBox plugin popups.
Get FireBox for Free
Enter your WordPress website URL to install instantly.
Trusted by 9,000+ users
0 Comments