


How to Install a Plugin
Thank you for choosing the FireBox WordPress popup plugin to drive sales and collect emails with smart popups!
System Requirements
Our main goal is to create the fastest and most advanced plugins for WordPress. To achieve this, we ensure they are based on the latest technology available. Before proceeding with the installation of our plugin, make sure you meet the System Requirements.
Install using your WordPress Dashboard
The best way to install our WordPress plugins is through the plugin search in your dashboard. First thing you need to visit the Plugins > Add New page inside your WordPress admin area.
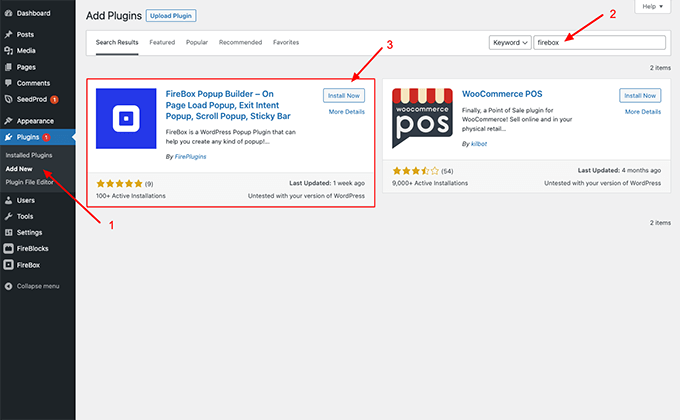
You will see a screen like the one in the screenshot above. In the search box at the top right corner, type the plugin you would like to install and hit enter. After that, you will see the plugin in the results. Click “Install Now”.
In the next few seconds, WordPress will download and install the plugin for you. The ‘Install Now’ button will change into an ‘Activate’ button after this.
WordPress plugins can be installed on your site, but they won’t work until they are activated. To use the plugin on your WordPress site, simply click the activate button.
All done, the plugin is now installed successfully!
Install/Update using FTP
You can also install/update a WordPress plugin using File Transfer Protocol (FTP) or preferably the secure version, Secure File Transfer Protocol (SFTP). If you are not sure how to do this you should contact your host provider to assist you further.
In order to be able to install/update a plugin, you will need to have the following:
- Your site’s FTP or SFTP login information
This information is essential in order to be able to log into your site and install a plugin. If you do not have this information, you should contact your host provider and get your host (or IP address), Username, Password as well as Port number.
- An (S)FTP program
After you have obtained your login information, you need a program to be able to log in to your site. Such a program is FileZilla but you may use any other (S)FTP program recommended by your host provider.
After you have logged in to your site using your (S)FTP program, you will need to download the plugin, unzip it, and upload the plugin files. We recommend you back up your site prior to installing the plugin.
Step 1. Download the plugin zip file into your computer.
If you already have the plugin zip file, skip to Step 2.
Go to https://wordpress.org/plugins/firebox, click on Download, and save it on your computer.
Step 2. Extract the downloaded zip file.
How to Update a Plugin
Step 3. Upload the extracted files to your plugins folder within your (S)FTP program, navigate to wp-content/plugins and upload the extracted plugin folder(firebox). Ensure you overwrite the existing plugin-files. You do not have to worry about losing data by doing so, this ensures you get the latest version of the plugin.
Upgrading to Pro
To upgrade FireBox Lite to the Pro version, you can read more here: How to Upgrade From Lite to Pro.
Activating your License
To activate your license, you can read more here: How to activate FireBox Pro.
We continually work to improve our WordPress plugins. Adding new features, fixing bugs, and strengthening security will always be a priority. It is imperative that our plugins be updated in order to take advantage of these changes. Learn how to safely update our plugins by following the instructions in the How to Update a Plugin guide.
