


Would you like to enhance your WordPress site by incorporating a custom font that will make your design stand out and improve your site's readability and user experience?
There are many options available beyond the default fonts provided by your WordPress theme. By adding a custom font, you can choose from a wide variety of options to find the perfect fit for your site. Give it a try and see the difference it can make.

In this article, we will look into a plethora of resources where you can find awesome-looking custom fonts, and how to add them to your WordPress site using two different ways.
Benefits of Using Custom Fonts
There are several benefits to using custom fonts on your website, including the following:
- Improved aesthetics: Custom fonts can help make your website more visually appealing and unique, which can help it stand out from other sites and attract more visitors.
- Better readability: Choosing a custom font that is easy to read can help improve the user experience on your site by making it easier for visitors to read and understand your content.
- Increased brand recognition: Using a custom font can help reinforce your brand and make your site more recognizable to visitors. This can be especially useful if you have a unique font that is closely associated with your brand.
- Greater flexibility: Using custom fonts allows you to have more control over the look and feel of your site, which can be useful if you want to create a unique design that is not possible with standard fonts.
Overall, using custom fonts can help make your website more attractive, user-friendly, and memorable, which can help it attract more visitors and improve its overall performance.
Where to find custom fonts for your WordPress site
There is a variety of places where you can find custom fonts for your WordPress site but the most popular ones include Google Fonts, Typekit, fonts.com, and FontSquirrel fonts.
A letter of advice here would be not to overuse custom fonts as they could slow down your WordPress site. It’s recommended to have one and at most two custom fonts on your site while keeping consistency across the board.
With that said, let’s see which ways we can use to add custom fonts to your WordPress site.
Using a WordPress plugin to add custom fonts
For beginners, the recommended method is to use a WordPress plugin to add custom fonts to your WordPress site. WordPress plugins provide the easiest way to add custom fonts to your website without editing any code.
WordPress plugins are generally easy to use and offer a simple user interface that makes adding custom fonts to your site a breeze. It saves you time and effort compared to writing the code manually.
With this method, you can choose a custom font from a list of already existing fonts, or even create your own! Some plugins give you e.g. the ability to choose from a variety of fonts and sizes or customize font colors to match your website design.
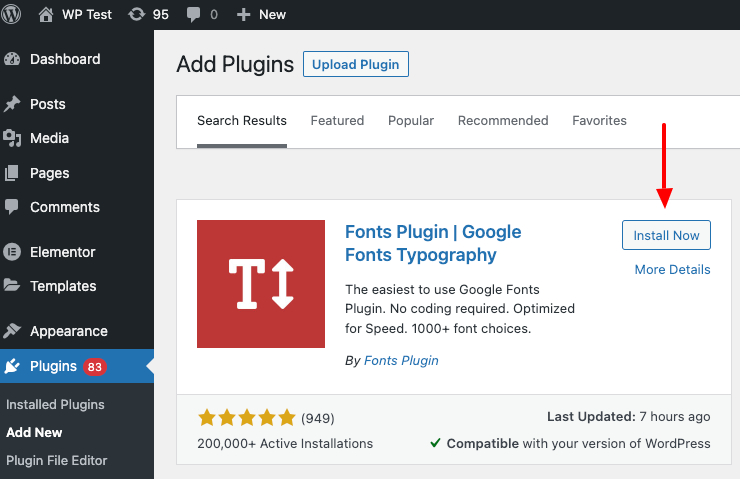
The very first thing you’ll need to do is download the “Fonts Plugin” which you can find in the WordPress Plugin Directory.
Once you have installed and activated the plugin, go to the plugin page > Customize Fonts > Fonts Plugin > Basic Settings to start searching for the Google font of your choice.
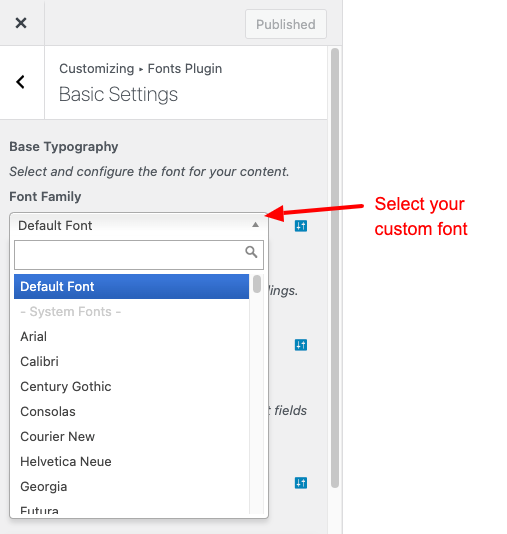
Once you have found the font of your choice, select it and click the 'Publish' button to apply your changes.
You can further customize the font by clicking the icon next to the dropdown to select the Font Weight as well as Font Style.

Furthermore, you can also select different fonts for headings, buttons, inputs as well as every aspect of your site.
Note: You should use between one and two Google Fonts for your WordPress site to ensure you don’t face any performance issues.
Using a WordPress plugin to add custom fonts to your WordPress site is a quick and easy way to enhance the visual appeal of your website. By following these steps, you can easily add custom fonts to your site without having to write any code, and customize their appearance to match your site's design.
Using a child theme to add custom fonts
Incorporating custom fonts into your WordPress website can be a breeze with the use of functions.php. By following a few simple steps, you can easily add custom fonts to your site's design without the need for manual code editing.
If you're unfamiliar with creating child themes, our guide on "How to Create a WordPress Child Theme (Beginner's Guide)" can be helpful.
Adding custom fonts via a child theme's function.php can improve the performance and speed of your website as it's optimized to efficiently load and display custom fonts, which can enhance the user experience for your visitors.
Google Fonts
Load the custom font
To load a Google font on a website, you can use the Google Fonts API. First, go to the Google Fonts website and choose the font you want to use. Then, click the "Add to Collection" button for the font, and click the "Use" button in the bottom right corner of the page. This will open a pop-up window with the HTML and CSS code you need to use the font on your website.
To use the font, you will need to add the HTML code to the <head> element of your website's HTML, and the CSS code to your website's stylesheet. The HTML code will include a <link> element that references the Google Fonts API and specifies the font you want to use. The CSS code will include the @import rule, which imports the font from the Google Fonts API and applies it to your website.
Here is an example of how the HTML and CSS code provided by the Google Fonts website might look:
<!-- Add this code to the <head> element of your HTML -->
<link href="https://fonts.googleapis.com/css?family=Roboto&display=swap" rel="stylesheet">
/* Add this code to your CSS stylesheet */
@import url('https://fonts.googleapis.com/css?family=Roboto&display=swap');
Use the custom font
Once you have added this code to your website, you can use the font-family property to apply the font to any element on your website. Here is an example of how you could use the font-family property to apply the "Roboto" font to all <p> elements on your website:
p {
   font-family: "Roboto", sans-serif;
}
Keep in mind that the Google Fonts API is a third-party service, so you will need to be connected to the internet to use the font on your website. Additionally, not all browsers support all font formats, so you may need to provide multiple formats of the font to ensure that it works in all browsers. You can read more about using Google fonts on a website in the Google Fonts documentation.
Custom Fonts
Load the custom font
To load a custom font on a website, you can use the @font-face rule in CSS. This rule allows you to specify the font you want to use, as well as where it is hosted. Here is an example of how you could use the @font-face rule to load a font called "MyFont" from a URL:
@font-face {
   font-family: "MyFont";
   src: url("https://www.example.com/fonts/myfont.woff2") format("woff2");
}
Once you have added the @font-face rule to your CSS, you can use the font-family property to apply the font to any element on your website. Here is an example of how you could use the font-family property to apply the "MyFont" font to all <p> elements on your website:
Use the custom font
p {
   font-family: "MyFont";
}
Keep in mind that the font must be hosted on a web server and the URL you provide in the @font-face rule must be accessible from the website where you are using it. Additionally, not all browsers support all font formats, so you may need to provide multiple formats of the font to ensure that it works in all browsers. You can read more about the @font-face rule and how to use custom fonts on a website in the CSS specification.
Conclusion
In conclusion, adding custom fonts to your WordPress site can greatly enhance its visual appeal and make it stand out from others. Each way to add a custom font to your WordPress site depends on the user level and experience with WordPress.
Using a WordPress plugin to add custom fonts is a convenient and efficient way to incorporate custom fonts into your site's design while not having to have knowledge of writing any code and is suggested to most beginner users.
Alternatively, you can add custom fonts to your WordPress site by writing code. This involves uploading the font files to your website and adding the necessary code to your theme's functions.php and style.css files. This allows you to have more control over the font's appearance and where it is used on your site, but it requires some knowledge of coding.
Overall, whether you use a WordPress plugin or write code to add custom fonts to your WordPress site, the result can be a visually appealing and unique website that provides a better user experience for your visitors.
Get FireBox for Free
Enter your WordPress website URL to install instantly.
Trusted by 9,000+ users


0 Comments