


Popups can boost signups, recover abandoned carts, and drive sales. But if you're guessing which headline, offer, or call-to-action works best, you’re not getting the full value.
The truth is, small changes can make a big difference. A popup that converts at 1% versus 5% can mean thousands of extra leads or sales. The only way to find out what actually works is through A/B testing.

In this guide, I’ll show you exactly how to A/B test your WordPress popups. You’ll learn what to test, how to test it, and how to do it all without needing a complicated or expensive setup. If you want real results, this is where you start.
Stop Guessing, Start Testing Discover which headlines and offers truly drive conversions.What is A/B Testing?
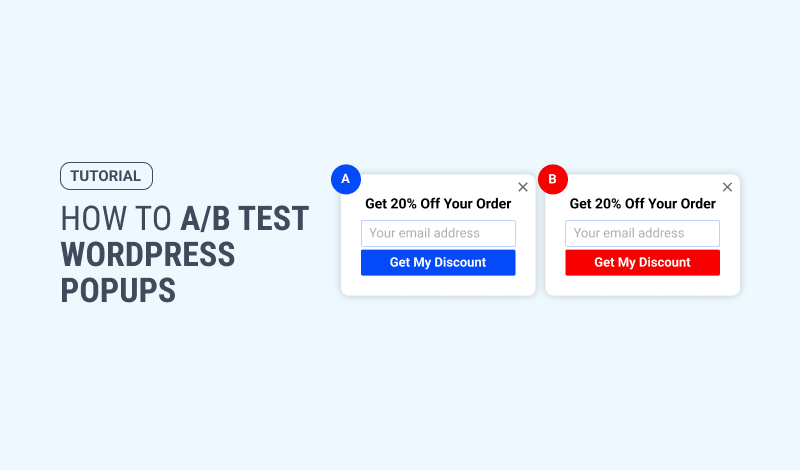
A/B testing (also known as split testing) is a simple yet profound method for comparing two versions of something to see which one performs better. In the context of popups, you show version "A" (the control) to one segment of your audience and version "B" (the variation) to another. You then measure which version achieves a higher conversion rate for a specific goal (like a click or a form submission).
Why is this so critical?
- It Replaces Guesswork with Data: Every decision you make about your popups, from the headline copy to the button color, is an assumption. A/B testing validates these assumptions with real user data, allowing you to make informed choices that directly impact your bottom line.
- It Leads to Incremental, Compounding Gains: A 20% lift in conversions from a single test might seem small, but these wins add up. A better headline this month, a more effective image next month, and a clearer CTA the month after can compound to double or even triple your popup's effectiveness over a year.
- It Lowers Risk: Want to try a bold new headline or a completely different offer? Instead of rolling it out to 100% of your audience and hoping for the best, you can test it on a segment first. If it works, great. If it fails, you've minimized the impact and learned a valuable lesson.
- It Improves the User Experience: A/B testing isn't just about what you want; it's about what your users want. By testing different approaches, you discover what resonates most with your audience, leading to a more intuitive and satisfying experience for them.
The Anatomy of a High-Converting Popup: What to Test
The key to successful A/B testing is to only test one element at a time. If you change the headline, the image, and the button color all at once, you'll have no idea which change was responsible for the lift (or drop) in conversions.
Here are the most impactful elements to test in your WordPress popups:
1. The Headline This is the most important element. It's the first thing your visitor reads and it must grab their attention immediately.
- Test Angles:
- Benefit-Driven: "Get 10% Off Your First Order" vs. "Unlock Your Exclusive Discount"
- Urgency/Scarcity: "Limited Time: 24-Hour Flash Sale" vs. "Shop Our Flash Sale"
- Question-Based: "Ready to Save More?" vs. "Save More Today"
- Direct & Clear: "Join Our Newsletter" vs. "Be an Insider"
2. The Call to Action (CTA) The CTA is the final instruction for your user. Clarity and motivation are key.
- Test Angles:
- Button Text: "Get My Discount" vs. "Shop Now" vs. "Apply Code"
- Button Color: A high-contrast color that stands out from the rest of the popup usually works best, but test it! Green, orange, and blue are common starting points.
- Button Size & Shape: A larger button can draw more attention, while a rounded button can feel more modern and clickable.
3. The Offer The perceived value of your offer is a massive lever for conversions.
- Test Angles:
- Discount Type: "15% Off" vs. "Free Shipping" vs. "$10 Off Your Order"
- Content Offer: "Download the Free eBook" vs. "Get the Ultimate Checklist"
- Framing: "Get a 15% Discount" vs. "Save 15% Instantly"
4. The Visuals (Image or Video) An image can convey emotion and value faster than text.
- Test Angles:
- Image vs. No Image: Does an image help or distract?
- Product Image vs. Lifestyle Image: Show the product itself or someone happily using it?
- Stock Photo vs. Custom Graphic: A custom illustration might outperform a generic stock photo.
5. The Body Copy This is your chance to elaborate on the headline and reinforce the value proposition.
- Test Angles:
- Short vs. Long: A few bullet points vs. a short paragraph.
- Tone of Voice: Professional and direct vs. friendly and casual.
- Social Proof: "Join 20,000+ happy customers" vs. a more generic benefit statement.
6. Form Fields For lead generation popups, the form itself is a point of friction.
- Test Angles:
- Number of Fields: "Email only" vs. "Name and Email." The rule of thumb is that fewer fields lead to higher conversions. Test it to be sure.
- Placeholder Text: "Enter your email address" vs. a more creative "[email protected]".
7. Triggers and Timing When and how your popup appears is just as important as what's in it.
- Test Angles:
- Exit-Intent: Shows only when a user is about to leave.
- Time Delay: "Show after 10 seconds" vs. "Show after 30 seconds."
- Scroll Percentage: "Show after scrolling 50% down the page" vs. "Show after 75%."
How to A/B Test Popups with FireBox
You don't need a dedicated, pricey A/B testing tool to get started. If your popup plugin has built-in conversion tracking, you can run a highly effective manual test. For this guide, we'll use FireBox, a powerful and intuitive popup builder for WordPress.
The key is that FireBox's Gutenberg-based editor makes creating variations a breeze, and its built-in stats tracking allows you to measure conversions on any button or form submission.
First things first, let's install FireBox:
Step 1: Install FireBox
To install FireBox, navigate to Plugins → Add New in your WordPress dashboard and search for FireBox. Next, click the Install Now button and wait for the plugin to be installed. Once the plugin is installed, you can click the Activate button.
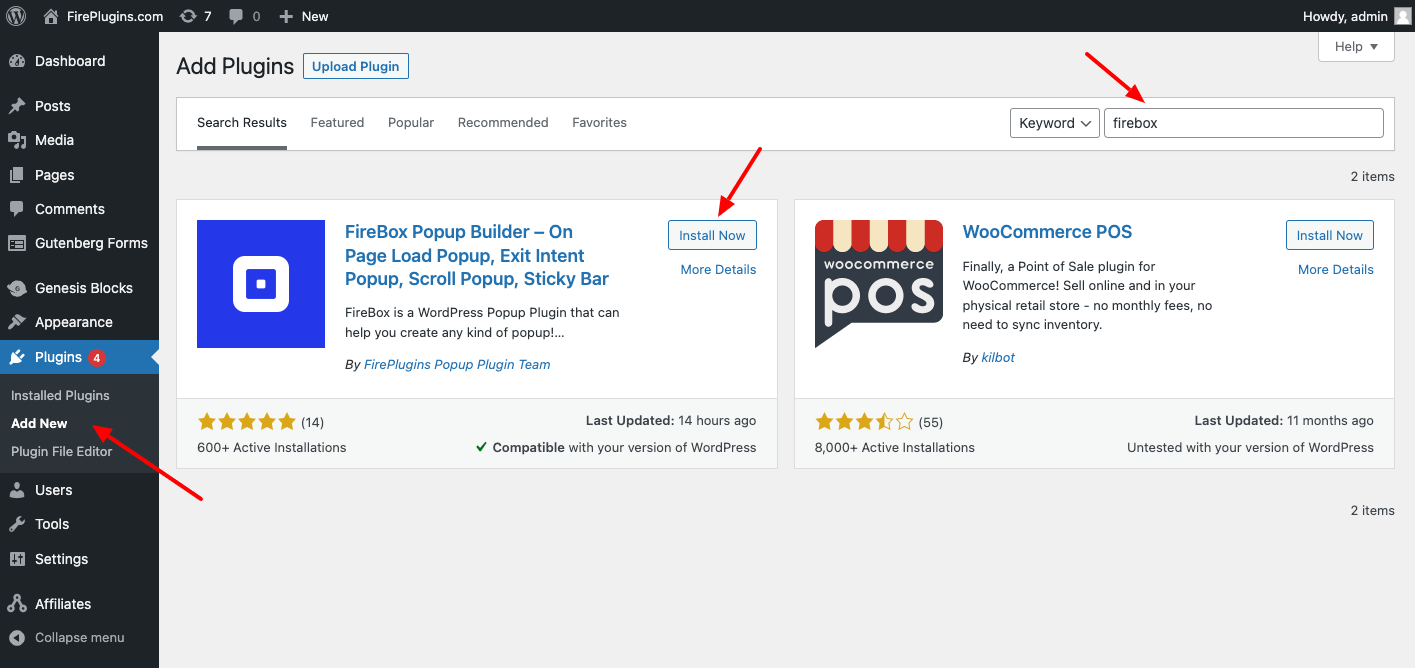
If you face trouble installing the plugin, consult the How to Install FireBox documentation page.
Step 2: Formulate Your Hypothesis
Before you build anything, state clearly what you're testing and what you expect to happen. A good hypothesis follows this structure:
"By changing [Independent Variable] from 'A' to 'B', we predict it will [Increase/Decrease] [Conversion Metric] because [Your Rationale]."
Example Hypothesis: "By changing the CTA button text from 'Submit' to 'Get My Free Guide', we predict it will increase form submissions because the new text is more specific and highlights the benefit to the user."
Step 3: Create Your Control (Variation A)
First, build your baseline popup. This is your "control."
- In your WordPress dashboard, go to FireBox > New Campaign.
- Design your popup. Let's say you're creating an email sign-up form. You'll add a headline, some body text, and a form.
- Name it clearly. For example: "Ebook Download Popup - A (Control)".
- Crucially, set up conversion tracking. Select the main button or the FireBox form block in your popup. In the block settings panel on the right, find the FireBox Panel and enable the "Track as conversion" toggle. This tells FireBox to count every click or submission of this element as a conversion. Note that this is not necessary when using the FireBox form block, as it automatically tracks conversions when the form is submitted.
- Configure your trigger (e.g., Exit-Intent) under the Format tab and any display conditions under the respective-named panel.
- Publish it.
Step 4: Create Your Variation (Variation B)
Now, let's create the version we'll test against the control. The goal is to change only one thing based on your hypothesis.
- Go to the FireBox Dashboard. Find your control campaign, "Ebook Download Popup - A (Control)".
- Hover over it and click the "Duplicate" action. This creates an exact copy.
- Open the duplicated campaign. Rename it immediately to "Ebook Download Popup - B (CTA Text)". The name should clearly state what you changed.
- Make your single change. Following our hypothesis, you would select the button and change its text from "Submit" to "Get My Free Guide". Do not change anything else—not the colors, not the headline, nothing.
- Verify that the "Track as conversion" toggle is still enabled on the button. Since it's a duplicate, it should be.
- Publish this second campaign, but make sure it's not active on the site yet. It should be published but have no active triggers or conditions, or be set to draft.
Step 4: Run the Test (Sequentially)
Since we are running this test manually, we will run each variation for a set period of time. This is called a sequential test.
- Run Variation A (Control): Let Variation A run on your site for a fixed period, for example, one full week (Monday to Sunday). This helps smooth out any daily traffic fluctuations.
- Record the Results: At the end of the week, go to the FireBox Dashboard. Note the Views and Conversions for "Ebook Download Popup - A (Control)".
- Run Variation B (Variation): Now, disable the control campaign (set it to draft) and activate "Ebook Download Popup - B (CTA Text)". Let it run for the exact same duration—one full week.
- Record the Results: At the end of the second week, record the Views and Conversions for Variation B.
Important Note: For this method to be as accurate as possible, try to run your tests during periods of "normal" traffic. Avoid major holidays, sales events, or viral marketing campaigns that could skew the data for one of the variations.
Step 5: Analyze the Results and Declare a Winner
Now for the moment of truth. You have the data, so let's calculate the conversion rate for each version.
The formula is simple: Conversion Rate = (Number of Conversions / Number of Views) * 100
- Variation A (Control):
- Views: 10,000
- Conversions: 200
- Conversion Rate: (200 / 10,000) * 100 = 2.0%
- Variation B (New CTA Text):
- Views: 10,200 (traffic is never identical, but should be close)
- Conversions: 357
- Conversion Rate: (357 / 10,200) * 100 = 3.5%
In this example, Variation B is the clear winner. Your hypothesis was correct! The new button text resulted in a significant lift in conversions.
Turn Insights Into More Sales Apply winning variations and keep testing for higher conversions.Step 6: Iterate or Implement
You now have a data-backed winner.
- Implement: Make Variation B your new control popup.
- Iterate: The process doesn't stop here! Can you beat the new 3.5% conversion rate? Form a new hypothesis. Perhaps a different headline could improve it even more. Duplicate your new winning popup, change the headline, and run the test again.
This continuous cycle of testing and iteration is the heart of Conversion Rate Optimization (CRO) and is how you achieve massive, long-term growth.
Conclusion
Moving from "I think this will work" to "I know this works" is a game-changer. It's the difference between an amateur and a professional marketer. While the manual A/B testing framework requires a bit of discipline, the payoff is enormous.
By following this step-by-step guide, you can uncover powerful insights about your audience, systematically improve your results, and turn your popups into finely-tuned conversion machines.
Get FireBox today and use its intuitive editor and built-in conversion tracking to build and test your first popup in minutes. Stop guessing and start converting.
Get FireBox for Free
Enter your WordPress website URL to install instantly.
Trusted by 9,000+ users

0 Comments